Advanced Technique
Creating Themes in Membergate
*This is an advanced technique and likely requires knowledge of HTML, CSS and the creation of themes.
Theme File and Folder Structure
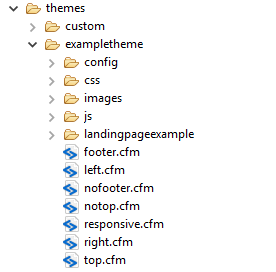
All the files for a theme are stored in their own folder, which is added to the "themes" directory in the root folder of the site. The theme folder will be installed as a zip file through your site's control panel. More details for the upload can be found in the last section of this tutorial.
Sample File Structure:
Required Files
All themes MUST include the following files:
- top.cfm - The Header for the Site
- notop.cfm - The Header for the Site which has NO visual elements - this is used when a content page is configured to NOT show the header, but MUST include typical elements such as the HTML HEAD section, scripts and stylesheets etc.
- left.cfm - Left Navigation Panel
- right.cfm - Right Navigation Panel
- responsive.cfm - Responsive Navigation Panel
- footer.cfm - footer for the site
- nofooter.cfm - footer for the site when NO visual elements are shown - this is used when a content page is configured to NOT show the footer.
- css/style.css - The main stylesheet for the site. This can be used to create optional settings for the theme.
- images/themePreview.png - The preview image of the theme that is used in the list of available themes on the site.
(**If you choose NOT to use nav panels: The files left.cfm, right.cfm and responsive.cfm can be left blank, but they MUST still be included in the theme)
Other Recommended Folders
We also recommend creating the following folders to store other assets for the theme
- config - Stores Configurational Information and Settings for the Theme
- css - Stores Stylesheets for the Theme
- images - Stores Theme Images
- js - Stores Extra Scripts used in the Theme
Sample Theme Files
For guidance, download our Example Theme
Code Structure
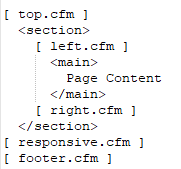
All themes must adhere to the following code structure.
There is very little fixed HTML - the majority of the code is contained within the theme files so you should have full control over the layout, as well as the look and feel of the site.
Integrating the Built-in MemberGate Layout
The standard MemberGate Layout can still be used in various areas of the site (for example: forums, classified ads, resource directory, etc). The layout stylesheet can be included in your theme.
MemberGate Layout Location
The URL of that stylesheet on your site is:
/layout/themes/standard/css/layoutstyle.css
Hooks
Particular elements from the Membergate system can be used through the following webhooks.
Important Note
The webhooks all need to be contained within CFOUTPUT tags:

Webhook Format
- #theme.metaTags()#
This adds the standard Meta Tags used in Membergate to the HEAD section of your site. - #theme.headerScripts([bootstrapVer="x"],[jqueryVer="y"],[jqueryUIVer="z"])#
This adds the standard Membergate Javascripts, that need to be added to the header of your site - it includes scripts such as JQuery, JQuery-UI, various other plugins used within the system, and the common core JS files.
You can choose to use the default version of the specific Library by entering the value default
You can also upload a version of the relevant library as part of your theme, by uploading into the /includes/ folder, and setting the argument value to be theme
If you would like to use a specific version of Bootstrap, JQuery or JQuery UI, you can enter that in the arguments above.
All of the arguments are optional, so if you don't include them, the site will use the default version used by Membergate, which are listed below:
- Bootstrap - v4.0.0 alpha 6
- JQuery - 2.2.0
- JQuery UI - 1.12.1 - #theme.footerScripts()#
This adds any scripts that can be, to the footer of the site, to improve the loading time of the site. You should include this Hook immediate before the closing BODY tag. - #theme.javascriptAllPages()#
If you have Javascript Code add to the Javascript to Include on All Pages in Edit Site Descriptions, you can use this hook to add that to All Pages using your theme. - #theme.googleTagManager()#
If you're using Google Tag Manager, you will need to include this Hook immediately after the opening BODY tag of your theme. - #theme.facebookConnect()#
If you're using Facebook Connect on your site, for elements such as like and share buttons, you will need to add this Hook immediately after the opening BODY tag of your theme. - #theme.copyright()#
You can use this Hook to add the Copyright Notice managed in Edit Site Descriptions to your theme. - #theme.breadcrumb()#
You can use this Hook to insert the breadcrumb trail in your theme.
If you use this webhook, the breadcrumb will no longer show at the top of the content page. - #theme.image([imageNumber=0],[format="src"],[showImage=FALSE])#
You can use this Hook to include the images uploaded to the page in the Header section of the site.
The arguments (imageNumber, format, and showImage) are all optional, and their default values are shown above.
- imageNumber - if you want to use the main image on a page, DON'T include this argument. Otherwise the number refers to the Image Number on the Content Page
- format - this argument determines what format you want the image to be returned in
- src - the URL of the image
- img - includes the full IMG tag for the image
- code - include the full IMG tag and container for the image - this is how it would normally appear on the page
- showImage - this determines whether or not the image is still shown on the content page - by default, if you use the image in the header, it will be suppressed on the content page, but you can still show by setting this argument to TRUE.
- imageNumber - if you want to use the main image on a page, DON'T include this argument. Otherwise the number refers to the Image Number on the Content Page
- #theme.themeBase()#
You can use this Hook to automatically include the folder location of your Theme directly in your theme files.
This is particularly useful when adding JS and CSS files to your theme. - #theme.login([row=TRUE])#
Adding this Hook to your theme will add a Login Form for the site.
The "row" argument is optional. When set to TRUE, the Login Form is displayed on a single row. When set to FALSE, the Login Form fields are stacked. - #theme.search()#
You can use this Hook to add a Search Form to your Theme. - #theme.loggedin()#
This Hook is used to determine whether or not the current user is logged in to the site.
You can use this to display different elements in your theme for Logged In members vs those who aren't Logged In.

- #theme.contactDetails()#
This Hook allows you to embed Contact Details for your site in your theme.
The Contact Details are set in the Shopping Cart Menu. - #theme.socialNetworks()#
This Hook allows you to embed Social Networking Icons for your site in your theme.
You can manage the Social Networks for the site in the My Social Networks menu in the Social Networking section of the Left Nav in the Control Panel.
Nav Panels
There is a Hook for each of the individual Nav Panels that Membergate uses, which allows you to import the code for the Nav Panel into your theme.
That means you can continue to control the Nav Panels by editing Categories and Departments on your site, and those changes will continue to be reflected on your site.
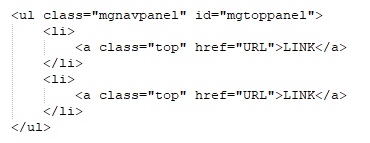
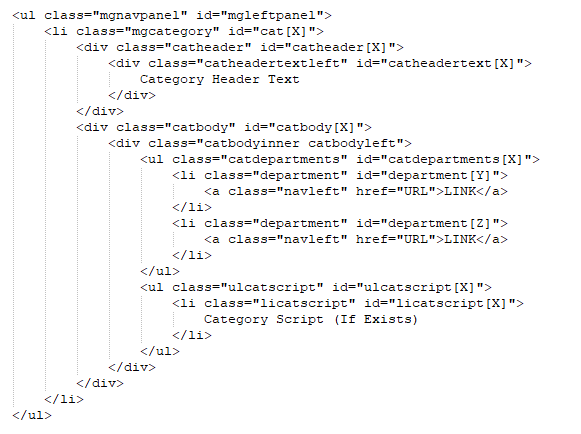
The Hooks are listed below, together with an example of the Code Structure for the Nav Panel once it is added to your site.
- #theme.topNav()#
- #theme.leftNav()#
- #theme.rightNav()#
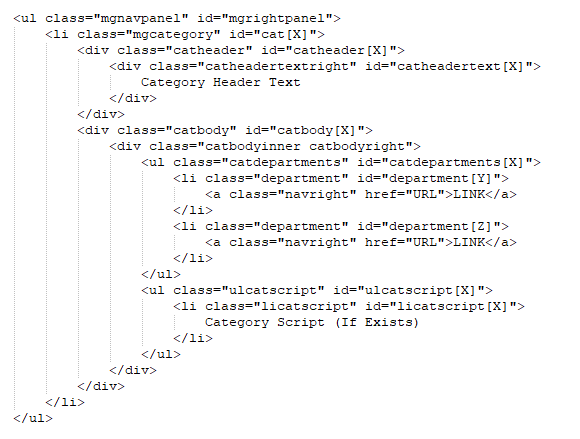
- #theme.responsiveNav()#
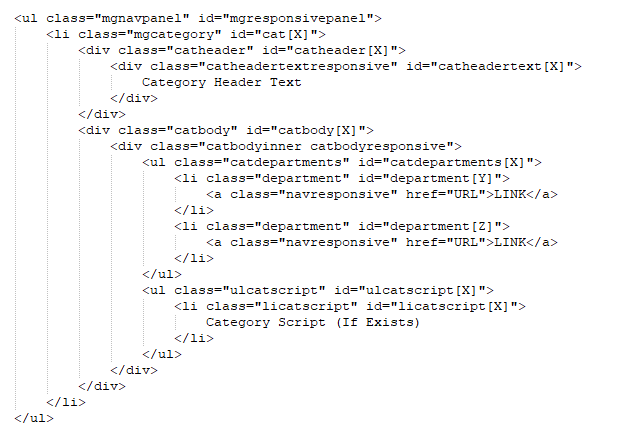
- #theme.footerNav()#
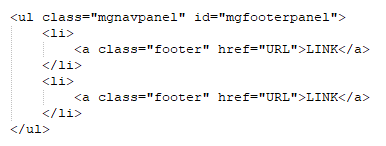
Settings
Settings can be defined to use through your theme. This means that a generic theme can be created, which will then allow site owners to configure certain elements for their own sites.
To create settings, you will need to create a file called settings.cfm in the config folder for the theme.
The content of that file should be a JSON (Javascript Object Notation) representation of your required settings, similar to the example below:
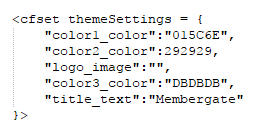
An Example
When you load the theme on your site, any settings that you add will be available for use (similarly to the Hooks, so will need to be wrapped in CFOUTPUT tags), using the following code:
#theme.settings.[SETTING NAME]#
So, if I wanted to use the "title_text" setting in the example above, I would use:
#theme.settings.title_text#
3 Setting Types
When creating your settings, there are 3 types of setting you can create:
- Text
This is used for simple Text variables, and to identify a text file, you need to append "_text" to the end of your variable name. - Color
This is used to handle hexadecimal colors. Append "_color" to your variable name. DO NOT INCLUDE THE # AT THE BEGINNING OF THE COLOR. - Image
This is used to handle image variables. Images are uploaded into the images folder within the theme directory, so when referencing, you will need to make sure they are addressed correctly.
Settings Menu
If settings have been configured for your theme and the theme is enabled on a site, the user will be provided a menu to configure those settings to Modify the Theme.
By default, the system will automatically generate the menu, based upon the "type" of the setting:
- Text
The user will be provided with a simple text box within which they can enter the new value. - Color
A Color Picker will be added to the menu that the user can use to select a Hex color. - Image
An Image Upload Button will be added so the user can select an image from their computer to upload, and will be uploaded to the images folder for the theme.
Customizing the Settings Menu
The Settings Menu can be customised by creating a file called menu.cfm within the config folder, which will contain a series of rows for each settings you have.
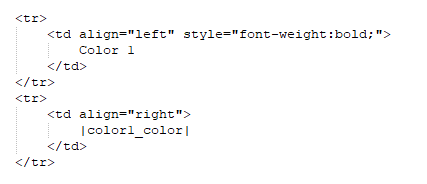
The editor will automatically replace the |color1_color| with the relevant input option for that particular setting.
Stylesheet Template
If you're using settings, it may be that you want to use those settings within the stylesheet for the theme - for example, if you wanted to change the color of the headline, or the background color of the nav bars etc.
In order to do that, create a Template Stylesheet File, called style-template.css, again in the config folder of the theme.
Within that template stylesheet, include the settings placeholder that has been created for the theme, surrounded by the pipe, |, symbol.
Template Stylesheet Example:
a {
text-decoration: none;
color: |color2_color|;
}
div.logo a {
color: |color1_color| !important;
}
How it Processes
When you make changes to the settings within the Modify Theme Menu, the system will read the Stylesheet Template, replacing any settings placeholders with the relevant value.
It will then write update the main stylesheet for the theme at css/style.css, so those settings will be applied to the site.
Creating a Custom Homepage
When using a theme, you can also create a completely custom public portal page for your site, which replaces the portal edited through the Membergate Control Panel.
That allows you to fully control the look and feel of the public side of your site, and be much more flexible in terms of design.
Since you have full control over the layout of the custom portal, you are not constricted to the standard Membergate Code Structure, and can modify the site as you please.
Adding a Custom Home Page to the Theme
In order to create a custom portal page, you need to create a folder called landingpage within the theme folder, and create a file called index.cfm within that folder.
You can then upload any other scripts, images and stylesheets within your landing page folder to create your desired page.
Installing the Theme
Once the theme is completed, you will need to Zip up the entire content of the theme folder.
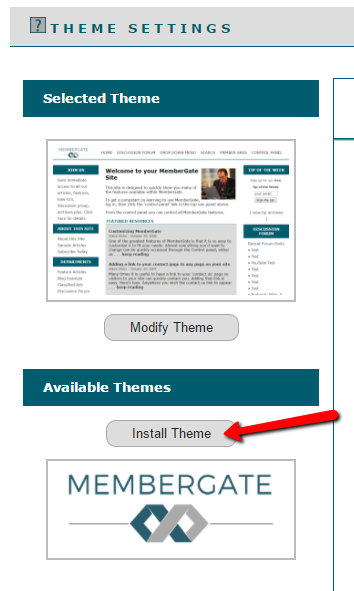
The theme can then be uploaded to your site using the Theme Uploading tool.
Click on the 'Install Theme' button
Enter a Name for your Theme, click on Upload Theme and Upload the Zip file. When the theme zip file has been installed, click on the 'Install Theme' button.
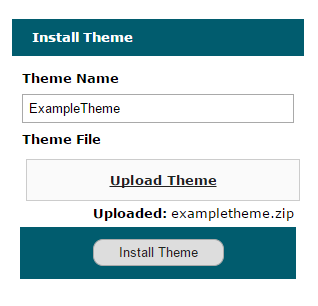
Once the Theme has successfully installed, select the new theme in the list of available themes to activate.
