
TUTORIAL: Creating a Member Bolt-On Management Page
Billing Bolt-On Sign-Up Tags allow you to create a member-facing section where members can review the bolt-ons currently active on their account and see additional bolt-ons available for their member plan.
This is useful when you want members to manage optional add-ons, such as extra access, recurring services, course access, offline services, or discounts. Depending on the settings, members can see what they already have, add available bolt-ons, or cancel eligible bolt-ons from their account.
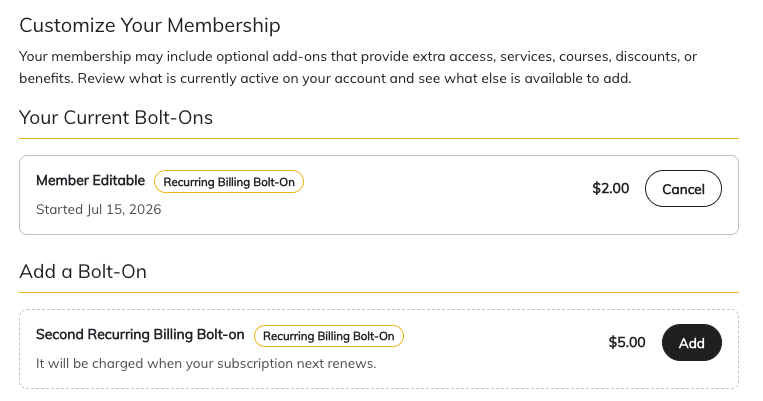
Example of the member-facing bolt-on section showing current bolt-ons and available bolt-ons.
Step 1: Review What Members Will See
The sign-up tag creates a section that can be added to a page for logged-in members. In this section, members can see their current bolt-ons and review any additional bolt-ons available to add.
Current Bolt-Ons
The current bolt-ons section shows bolt-ons that are already active on the member's account. This may include the bolt-on name, bolt-on type, start date, price, and a cancel button if the bolt-on can be removed by the member.
Available Bolt-Ons
The available bolt-ons section shows bolt-ons that the member is eligible to add to their account. These options are based on the member's plan and the bolt-ons included in the sign-up tag settings.
Add and Cancel Buttons
Members can manage their current bolt-ons to cancel when needed, or to add new ones to their account. Billing will be automatic using the card details in their member account.
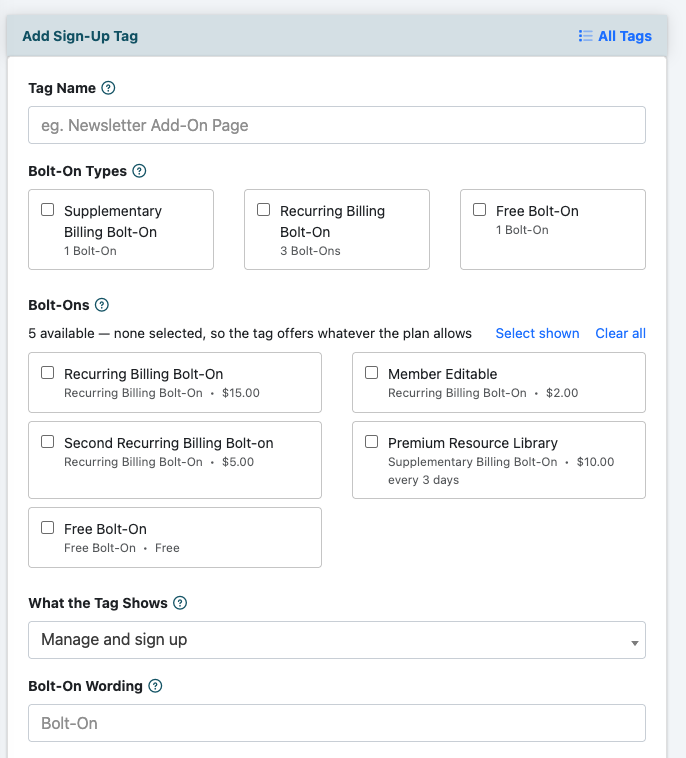
Use this screen to choose which bolt-on types and specific bolt-ons the sign-up tag can display.
Step 2: Add a Sign-Up Tag
Billing Bolt-On Sign-Up Tags can be found under Members Billing Bolt Ons. Click the Sign Up Tags icon to add or manage sign-up tags.
Use the Add Sign-Up Tag screen to create a new tag that can be placed on a content page.
Tag Name
Enter a name for the sign-up tag. This name is used for admin reference so you can identify the tag later.
Bolt-On Types
Select the types of bolt-ons that should be included in this sign-up tag. Available types may include Supplementary Billing Bolt-On, Recurring Billing Bolt-On, and Free Bolt-On.
This helps control which categories of bolt-ons can appear in the member-facing section.
Bolt-Ons
Select the specific bolt-ons that should be included in this sign-up tag.
If no individual bolt-ons are selected, the tag will offer whatever bolt-ons the member's plan allows, based on the selected bolt-on types.
If you only want this sign-up tag to display certain bolt-ons, check the box next to each bolt-on that should be included.
What the Tag Shows
Select what the tag should display.
| Option | What Members See |
|---|---|
| Manage and Signup | Members will see their current bolt-ons and any others that are available to add to their member plan. |
| Signup Only | Members will only see new bolt-ons that are available to add to their member plan. |
| Show Current Bolt-ons Only | Members will only see and manage their current bolt-ons. |
Bolt-On Wording
Use the Bolt-On Wording field to customize the label shown to members. For example, you may choose to use Bolt-On, Add-On, or another term that fits your site.
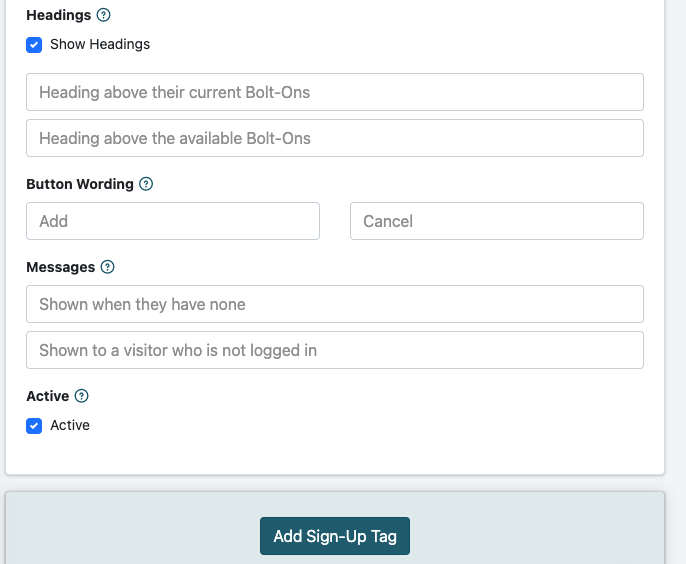
Use these fields to customize headings, button labels, messages, and active status.
Step 3: Customize the Display
Use the display settings to control headings, button wording, messages, and active status.
Show Headings
Check Show Headings if you want headings to display above the current bolt-ons and available bolt-ons sections.
Heading Above Current Bolt-Ons
Enter the heading that should appear above the member's current bolt-ons. For example, you might use Your Current Bolt-Ons.
Heading Above Available Bolt-Ons
Enter the heading that should appear above the bolt-ons available for the member to add. For example, you might use Add a Bolt-On.
Button Wording
Customize the wording for the action buttons. The first field controls the add button, and the second field controls the cancel button.
For example, you might use Add and Cancel.
Messages
Enter the message that should display when a member does not have any bolt-ons available or active, depending on the page settings.
You can also enter the message that should display when a visitor reaches the page but is not logged in.
Active
Check Active when the sign-up tag is ready to be used on the site. If the tag is inactive, it will not show on the page.
Step 4: Add the Sign-Up Tag to a Page
After the sign-up tag has been created and customized, add the generated sign-up tag to the content page where members should manage their bolt-ons.
The page can include an introductory headline and short explanation above the tag so members understand what they are viewing.
Example:
Customize Your Membership
Your membership may include optional add-ons that provide extra access, services, courses, discounts, or benefits. Review what is currently active on your account and see what else is available to add.