
So you are marketing your site using Facebook Ads. And you just had an increase in new memberships. The increase was certainly due to the sparkly new Facebook Ad, right? Before continuing to pay for an ad, you probably want to check out your return on the investment.
Enter Facebook Ad Conversion Tracking
Facebook provides a tracking code so you can measure the conversion rate of your Facebook ads so in turn you can measure your return on investment.
Awesome. I Have the FB Ad Conversion Tracking Code, Now What?
We are going to assume that you understand how to find the Facebook Ad Conversion Tracking code. And if not, have no fear, the code instructions can be found at this Facebook Business Help page.
There are two types of code to add to your site to implement the Facebook Ad Conversion Tracking: the Pixel Base Code and the Event Code.
The Rules
Pixel Base Code
The pixel base code is added to the HEAD section on every page of your site.

Event Code
There are various event codes. An event code is added to the HEAD section of specific pages. The specific event code used will depend on the type of page for which it is being added.

Where does the Pixel Base Code and Event Code Get Added to MemberGate?
In order to provide instructions on adding the code to your site, let's think of an example scenario:
For our example, let's pretend that the user sees Your Facebook Ad and they click on it. They are then redirected to your Sales Page on your MemberGate Site. From the Sales Page they click to sign up and go to your Subscription Form and they submit the form which sends them to your Welcome Page.
That funnel includes just three pages from your site:

First Things First: Adding the Pixel Base Code
The pixel base code has to be added to the HEAD section of all of your pages. To do that:
1. Copy the Pixel Base Code from your Facebook Account
2. From your MemberGate Control Panel on the right sidebar under 'Master Settings' choose 'Edit Site Descriptions'
3. Paste the Facebook Pixel Code into the 'Javascript to Appear on All Pages Box'

4. Press the 'Apply Style Changes' button at the bottom of the page
Adding the Event Code
There are various event codes from Facebook that can be added to your pages. Which event code added is going to depend on the type of page that you are measuring. The event codes are added to each specific page in the funnel, so in keeping with our example, we will only add the appropriate event codes.
The process of adding the event code will be the same for each content page. Only the specific event code will change.
Event Codes from Facebook
Let's Use the Following Event Codes retrieved from Facebook for our specific example pages:
Sales Page: fbq('track', 'InitiateCheckout');
Subscription Form: fbq('track', 'Purchase', {value: '0.00', currency: 'USD'});
Thank you Page: fbq('track', 'CompleteRegistration');
Add the Event Code to the Sales Content Page
1. Choose 'Content' > 'Pages' > 'Edit Page' and select your sales page
2. Under the 'Advanced' section check the box for 'Custom Scripts & Styles' field. This will open up another box
3. In the 'Custom Header Scripts & Styles' box, paste the following sales event code:
<script> fbq('track', 'InitiateCheckout');</script>

Add the Event Code to the Subscription Form Page
1. Choose 'Content' > 'Pages' > 'Edit Page' and select your Subscription Form page
2. Under the 'Advanced' section check the box for 'Custom Scripts & Styles' field. This will open up another box
3. In the 'Custom Header Scripts & Styles' box, paste the following sales event code:
<script> fbq('track', 'Purchase', {value: '0.00', currency: 'USD'});</script>

Add the Event Code to the Thank You Page
How do you find the thank you page? If there are multiple member plans on the subscription form, there may be various thank you pages. Each of those thank you pages will need the Facebook Event Code added to the page.
To Find the Thank you Pages:
1. Under 'Members' choose 'Edit Member Plans'
2. Select a Member Plan that is on the Subscription Form
3. Look for the 'New Member Welcome Page', as that is the thank you page (it's the page the user is sent to after submitting the subscription form

4. Repeat the steps for each of the member plans on the subscription form.
Add the Event Code to Each Thank You Page:
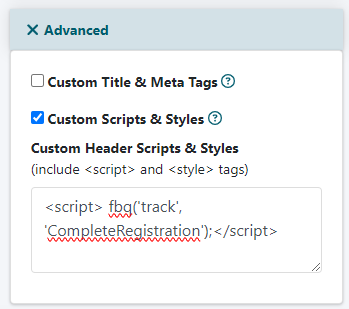
1. Choose 'Content' > 'Pages' > 'Edit Page' and select your thank you page
2. Under the 'Advanced' section check the box for 'Custom Scripts & Styles' field. This will open up another box
3.In the 'Custom Header Scripts & Styles' box,, paste the following thank you page event code:
<script> fbq('track', 'CompleteRegistration');</script>
4. Repeat steps 1 through 3 for each thank you page/member plan
Confirm the Pixel is Implemented Correctly
You can then confirm the pixel is implemented correctly through your Facebook Account. Then test the process to be certain that the event codes are triggering the correct messages in Facebook.