Tutorial
Introducing: Search and Select
If like us, you get tired of scrolling through drop down boxes looking for the page that you would like to edit, or the item that you want to update, then you will love our new "Search & Select" Feature
MemberGate Infinity allows us to offer this improved selection process so you no longer have to scroll through tens, hundreds or even thousands of pages or cart items!!
There is now the ability to type in some keywords and the software will automatically only show results in the drop down box with the text entered. A selection then just has to be made from the few items in the

Search first... then Select... So Simple!
Simply tap a few letters of the word you know and see the Selection automatically show the remaining matching pages or items
MemberGate developers are working on adding this functionality sitewide. But, for now, it is only available in the areas listed below.
Please see below for some examples of where you can use this time saver along with instructions on how it works.
Click on each tab to see the related Search & Select video example.
Finding a Content Page to Edit
Following the instructions below will provide you with an idea of how to use the new selection boxes when choosing a content page to edit.
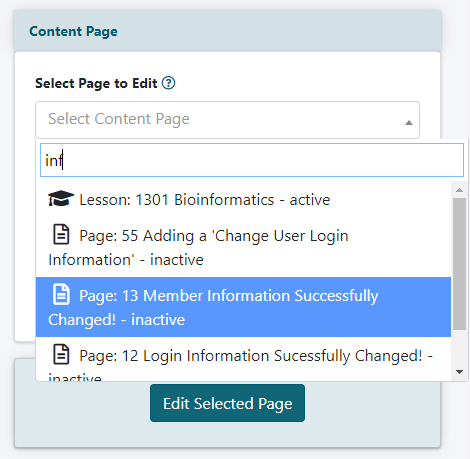
1. Editing a page settings can begin under Content Pages Edit Page
2. Click in the 'Select Page to Edit Box'
3. Begin typing a keyword that can be found in the headline of the content page.
4. The drop down menu will appear with headlines that meet the criteria of the letters that are being entered.
5. Select the desired content page to edit and press the button
Selecting a Department (or Cloning One) to Assign a Content Page
Following the instructions below will provide you with an idea of how to use the new selection boxes when choosing a department in the 'Edit Content' screen.
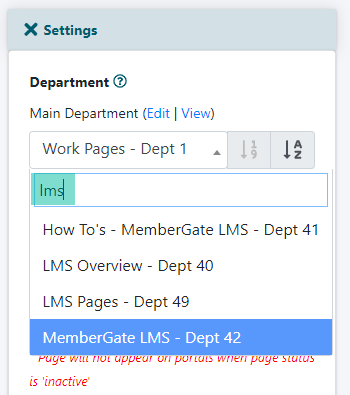
1. Adding a page settings can begin under Content Pages Add Page
2. Click on +Setting to open that section.
3. Click in the 'Main Department' box
4. Begin typing a keyword that is the name of a department.
5. Select the desired department from the drop down menu.
6. Follow these steps in the 'Subdepartments' box if adding the content page to additional departments.
7. To select multiple departments in the clone to department box, hold the CTRL key on the keyboard and the click on multiple department entries.
Choosing Related Articles on a Content Page
Following the instructions below will provide you with an idea of how to use the new selection boxes when choosing Related Articles to add to the bottom of the content page.
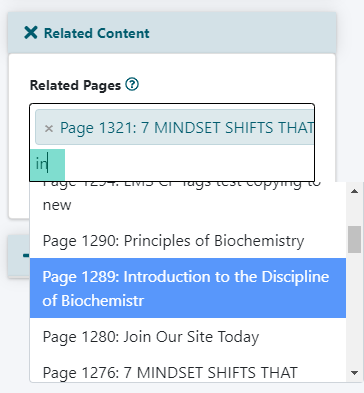
1. Adding a page settings can begin under Content Pages Add Page
2. Click on +Related Articles to open that section.
3. Click in the 'Related Articles' box.
4. The drop down menu will appear with Headlines that meet the criteria of the letters that are being entered.
5. Select the desired content page (or pages by holding the CTRL key to select multiple pages)
Edit Category
Following the instructions below will provide you with an idea of how to use the new selection boxes when choosing to edit a category.
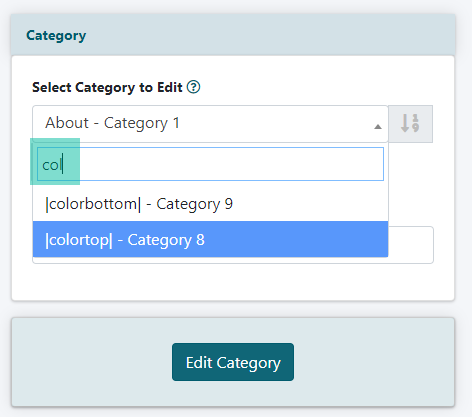
1. Editing a category can begin under Content Categories Edit Category
2. Click in the 'Select Category Edit' box
3. Begin typing a keyword that can be found in the name of the category.
4. Select the desired Category from the drop down menu to edit and press the button
Finding a Specific Product to Edit
Following the instructions below will provide you with an idea of how to use the new selection boxes when choosing an item to edit in the shopping cart.
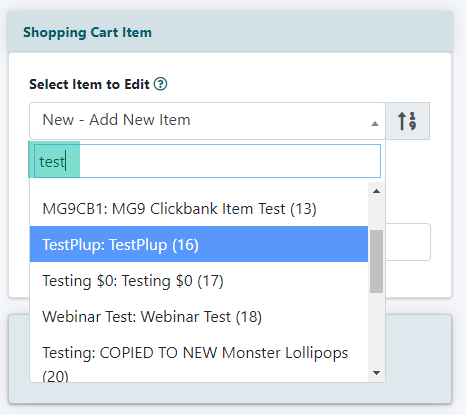
1. Editing a product can begin under Commerce Shopping Cart Add/Edit Products
2. Click in the 'Select Item to Edit' box
3. Begin typing a keyword that can be found in the 'Product Number' or 'Item Name' of the product***
4. Select the desired product item from the drop down menu to edit and press the button
***NOTE: The Item Name and the Headline are not the same with regards to products. The item name is for internal search purposes, and the headline is published on the shopping cart pages on the live site. The Headline is what the customer will see to descibe the product.
Finding an Order in the Shopping Cart
Following the instructions below will provide you with an idea of how to use the new selection boxes when looking for a customer name to find their order in the shopping cart.
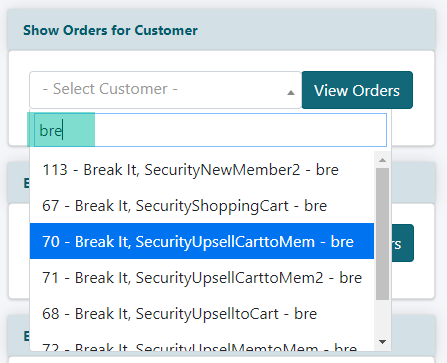
1. Editing a product can begin under Commerce Shopping Cart Find Orders
2. Click in the 'Show orders for Customer' box
3. Begin typing the name of the customer whose order is being searched
4. Select the desired customer name from the drop down menu and click on the button