
Tutorial
TUTORIAL: Member Limits
Use Member Limits to control how often members can access supported resources over a set period. Start with the Settings tab to configure how limits behave across your site, then use Set Up & Manage Limits to create and manage individual limits.
Member Limits can be configured at several levels, allowing you to start with a site-wide limit and then create more specific limits for Plan Levels, individual Plans, or individual Members.
Members Member Limits
Create the Site Limit
From the Member Limits page, click the Add New option in the upper-right corner.
A new row will open where you can select the type of limit and define the initial site-wide allowance.
1. Select the Limit
Use the Name field to select the type of activity you want to limit.
Currently, Downloads are available as a Member Limit.
2. Set the Site Limit
The Site Limit establishes the default allowance for all members on the site.
Enter the maximum number allowed and select the period in which that allowance applies:
| Period | How the Limit Works |
|---|---|
| Day | The allowance resets each day. |
| Month | The allowance resets each month. |
| Year | The allowance resets each year. |
| Billing Period | The allowance resets according to the member's billing period. |
For example, setting the Site Limit to 10 / Billing Period means that every member on the site can download up to 10 files during each billing period unless a more specific limit has been created for that member.
3. Unlimited Access
Enable Unlimited if the selected activity should not have a site-wide limit.
4. Make the Limit Active
Leave Active enabled to make the Member Limit available for use.
5. Save the Limit
Click Add Limit to save the new Member Limit.
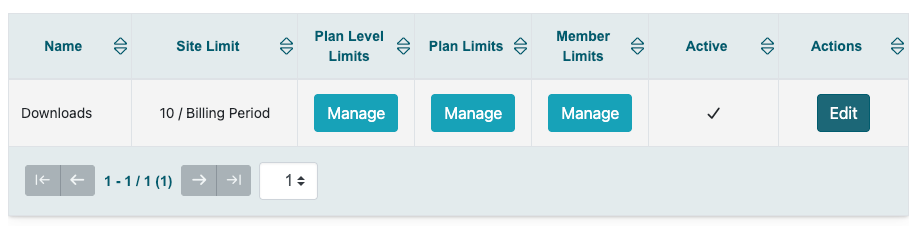
The limit will then appear in the Member Limits table where you can edit the Site Limit and manage more specific limits.
How the Member Limit Hierarchy Works
Once the Site Limit has been created, you can override it at three additional levels:
| Priority | Limit Type | Applies To |
|---|---|---|
| 1 - Highest | Member Limit | An individual member |
| 2 | Plan Limit | Members subscribed to a specific Member Plan |
| 3 | Plan Level Limit | Members whose plan belongs to a specific Plan Level |
| 4 - Default | Site Limit | All members who do not have a more specific limit |
Member Number Plan Number Plan Level Site Limit
The first matching limit in the hierarchy is used for the logged-in member.
Plan Level Limits
A Plan Level can group multiple Member Plans together. This is useful when several plans provide the same level of access but use different billing schedules.
For example, you might have monthly, semi-yearly, and annual Premium plans that all belong to a Plan Level named Premium.
Instead of creating the same limit separately for all three plans, you can create one Plan Level Limit for Premium.
To add a Plan Level Limit, click Manage for the appropriate Member Limit, then click Add New in the upper-right corner of the Plan Level Limits area.
Site Limit: 10 downloads per billing period
Gold Plan Level Limit: 20 downloads per billing period
Members whose plans belong to the Gold Plan Level can download 20 files. Other members continue to receive the Site Limit of 10.
Plan Limits
A Plan Limit allows you to create a different allowance for members subscribed to one specific Member Plan.
This limit overrides both the Site Limit and any Plan Level Limit that would otherwise apply.
Click Manage for Plan Limits, then click Add New to create a limit for a specific plan.
Site Limit: 10 downloads
Gold Plan Level Limit: 20 downloads
Plan 3 Limit: 50 downloads
Members on Plan 3 receive the 50-download allowance because the Plan Limit takes priority over the Plan Level and Site Limits.
Member Limits
A Member Limit provides the most specific level of control by allowing you to set an allowance for an individual member.
Member Limits override the Site Limit, Plan Level Limit, and Plan Limit.
Click Manage for Member Limits, then click Add New to create an override for a specific member.
Member Number 49 can be given Unlimited downloads. That setting applies only to Member 49, regardless of the limits assigned to the member's Plan, Plan Level, or the site as a whole.
Managing Existing Limits
The main Member Limits table gives you quick access to each level of the system.
- Site Limit displays the default site-wide allowance.
- Plan Level Limits allows you to manage limits assigned to Plan Levels.
- Plan Limits allows you to manage limits assigned to individual Member Plans.
- Member Limits allows you to manage limits assigned to individual members.
- Active shows whether the Member Limit is currently enabled.
- Edit allows you to update the main Site Limit.
The Member Limits Settings control how Member Limits behave across your site and what members see as they approach or reach a limit.
Members Member Limits Settings
Member Limits Settings
The first section controls how MemberGate counts access and what happens after a member reaches a limit.
Allow Repeat Access to Items
Enable Allow Repeat Access to Items if repeated access to the same item during the same period should only count toward the member's limit once.
For example, if a member accesses the same downloadable item more than once during the current period, it will only be counted as one use of the limit.
Allow Access to Items After Limit Reached
Enable Allow Access to Items After Limit Reached if members should continue to have access to items they already accessed during the current period after reaching their limit.
Access to new items will still be restricted.
Send Limit Reached Notification Email
Enable Send Limit Reached Notification Email to send an email notification when a member reaches their limit.
The notification is sent to the email address configured for the Member Limits notification.
Limit Messages
The Limit Messages section lets you control the messages members see as they approach a limit, reach a limit, or try to access something that is not available to them.
Show Approaching Limit Message
Enable Show Approaching Limit Message if you want to warn members before they reach their limit.
Approaching Limit Threshold
Enter the number at which the approaching-limit message should begin appearing.
For example, entering 2 can be used to notify a member when they are nearing the end of their available allowance.
Approaching Limit Heading and Message
Customize the heading and message shown to members when they are approaching their limit.
The default message can be edited to match your site's tone and provide any additional instructions members may need.
Limit Reached Heading and Message
Use the Limit Reached Heading and Limit Reached Message fields to control what members see once they have used their available allowance for the current period.
This is a useful place to explain why access has been limited and provide instructions for contacting support if additional access is needed.
No Access Heading and Message
The No Access Heading and No Access Message are shown when a member does not currently have access to the selected limited resource.
You can use this message to explain the restriction and direct the member to support or provide information about upgrading their account.
|limit| tag. Leave this tag in place when you want the message to dynamically reference the applicable limit.