
Tutorial
Adding a Billing Bolt-On to the Subscription Form
Billing bolt-ons can be added to subscription forms so members can select additional options during signup. Billing bolt-ons can also be assigned by an admin through Edit Member Details.
Full instructions to set up a subscription form can be found on the Subscription Form Generator tutorial.
Follow the steps below to add billing bolt-ons to a new or existing subscription form.
Subscription Form Generator
Billing bolt-ons can be added to subscription forms under Tools Subscription Form Generator.
Payment Options
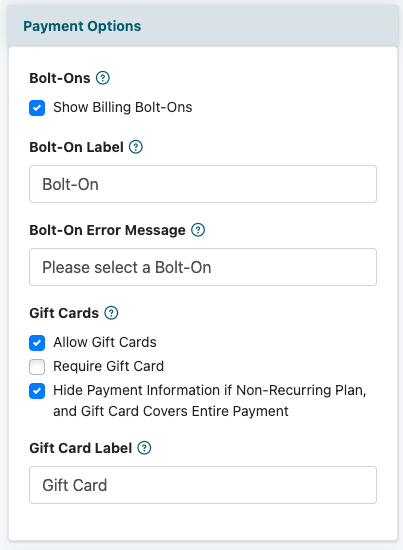
The bolt-on section is enabled under the Payment Options area of the subscription form settings.
Bolt-Ons - Check the box for Show Billing Bolt-Ons to allow billing bolt-ons to appear on the subscription form.
Bolt-On Label - If desired, enter a custom label for the bolt-on section. This is the text that will display on the subscription form above the available bolt-ons.
Bolt-On Error Message - Enter the message that should display if a bolt-on selection is required, but the user tries to continue without choosing one.
In this example, when the user selects the Monthly Plan, the billing bolt-ons assigned to that member plan are available to be shown on the subscription form. The form can include supplementary billing bolt-ons, recurring billing bolt-ons, recurring billing discounts, and free bolt-ons, depending on which bolt-ons have been assigned to that plan.
Member Plan Options
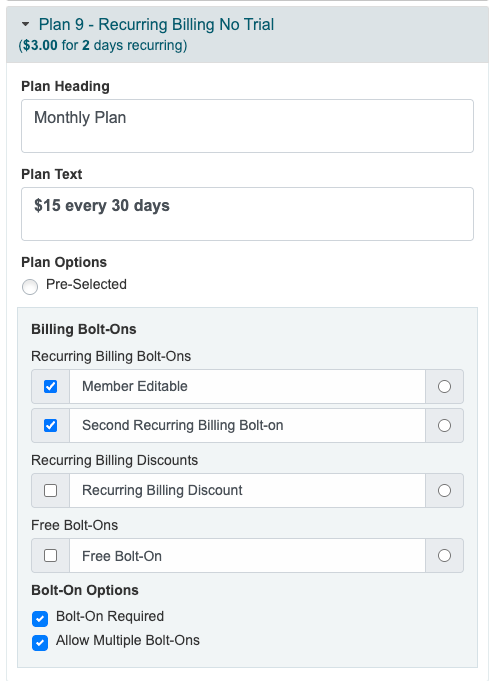
Billing bolt-ons are configured separately for each member plan on the subscription form.
Only the bolt-ons assigned to a specific member plan will appear in that plan's options. If a member plan has multiple bolt-ons assigned to it, all of those assigned bolt-ons will be available to select for that plan.
- Click and drag the desired member plan from the Available Plans box into the Selected Plans box.
- Click the arrow next to the member plan in the Selected Plans box to expand the plan options.
- Under Billing Bolt-Ons, the bolt-ons available for that member plan will appear by type. These may include:
- Supplementary Billing Bolt-Ons
- Recurring Billing Bolt-Ons
- Recurring Billing Discounts
- Free Bolt-Ons
- Check the box next to each bolt-on that should be shown when the user selects that member plan on the subscription form.
Bolt-On Selection Options
Checkboxes - The checkbox to the left of each bolt-on determines whether that bolt-on will be shown as an available option for the selected member plan.
Radio Button - The radio button to the right of the bolt-on can be used to choose the default bolt-on selection for that member plan. Only one bolt-on can be pre-selected at a time.
Required Bolt-Ons
There may be cases where a user must also select a bolt-on in addition to the member plan. In that case, the Bolt-On Required option can be enabled.
Bolt-On Required - Check the box to require the user to select a bolt-on before continuing.
Pre-Selected Bolt-On - If a bolt-on should already be selected when the member plan is chosen, click the radio button to the right of the desired bolt-on.
Allow Multiple Bolt-Ons
Allow Multiple Bolt-Ons - Check the box if the user should be able to select more than one bolt-on for the member plan. If this option is not checked, the user will be limited to a single bolt-on selection.