A course acts as a container for multiple sections.
Please review the step by step graphical instructions below to create your program's courses.
Adding an LMS Course can be found under Content LMS Courses
To Create a New Course:
Choose 'Create New Course' from the drop down menu and click the button.
To Edit an Existing Course
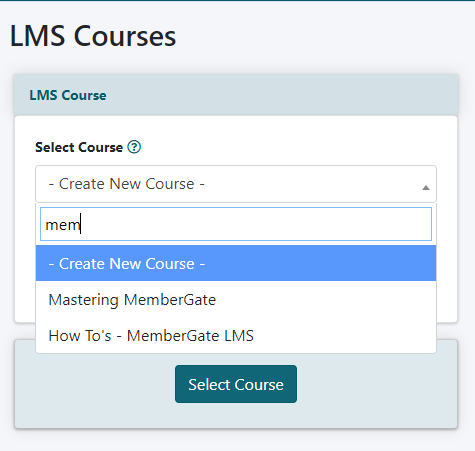
- Click on the drop down menu, and select the Course to Edit
OR TO FIND THE COURSE FASTER - Click in the drop down menu and begin typing a keyword in the Course. The software will pare the list to only those Courses with the keywords. Select the Course to Edit
- Click the button.
Click on each section to expand for more information.
Course
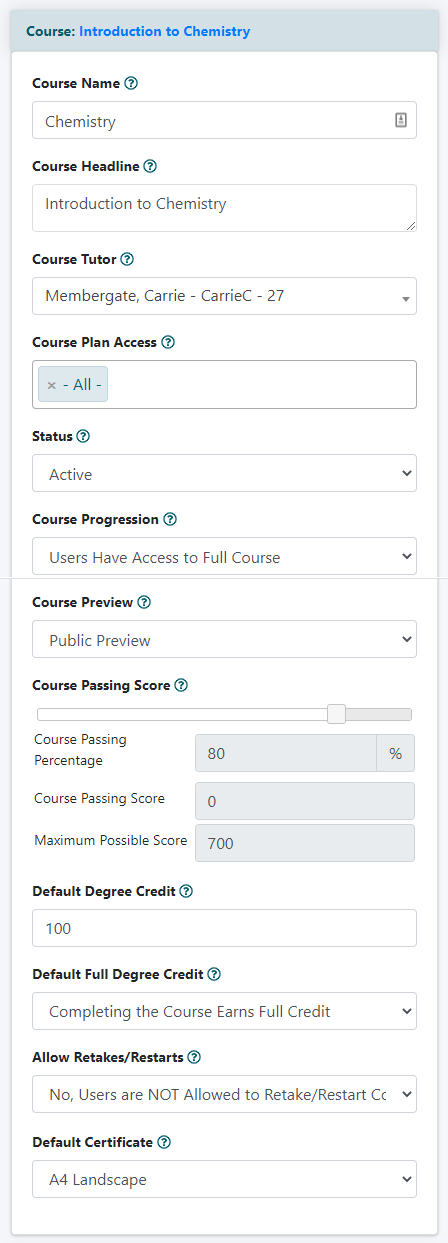
Course Name
Add a name for the course
The Course Name will appear for the user in the Course listed in the Degree program
Course Headline
Add a headline for the course
The Course Headline will appear for the user at the top of the Course overview and outline page
Course Tutor
Select a tutor option from the drop down menu.
The Name of the Course Tutor will appear for the user on the Listing of Courses Page.
Course Plan Access
Set which member plans can access this course.
The courses can be set as restricted access based on the member plan a member belongs to.
Status
Choose a status option from the drop down menu
A status of 'active' means the course will be published and live. A status of 'inactive' means the course will not be seen or published on the live site. Coming Soon will publish the course on the degree and dashboard page with a note that it is "coming soon." Setting the coming soon course to active will activate it.
Course Progression
It is possible to select if the full course is available for the users to navigate and read any lessons in any order, or they have to finish the lessons in chronological order. One lesson has to be completed before another one can be started.
To allow full access to the course, choose 'Users Have Access to Full Course' from the drop down menu.
If the user has to finish one lesson before accessing the next one, choose 'Users Must Work Through Each Lesson in Order' from the drop down menu.
Course Preview
Set if only members can see the course, or if a non-member can see the contents of the course.
Course Passing Score
Set the passing score necessary to complete and pass the course.
To adjust the course scores, click on the button at the end of the slide and slide to the left. The passing scores will be adjusted based on the passing percentage.
Default Degree Credit
Set the amount of credit points that finishing the course will be credited towards the total credits for the degree.
Default Full Degree Credit
When a course is completed, there are two options:
- The user can automatically receive the full credit for the Course
- The user can receive partial credit for the Course. Partial credit can be earned when there is a quiz or assessment that is finished with less than a full score.
Choose the full credit or partial credit option from the drop down menu.
Allow Retakes/Restarts
The student can be allowed to restart or retake the course. Alternatively, you can restrict the student from being able to retake the course.
To Disable a Retake: In the 'Allow Retakes/Restarts' field choose 'No, Users are Allowed to Retake/Restart a Course'
To Allow a Retake: In the 'Allow Retakes/Restarts' field choose 'Yes, Users are Allowed to Retake/Restart a Course'
Alternatively, choose 'Yes, Users are Allowed to Retake/Restart a Course After Completion' if the user has to first finish all the sections prior to restarting.
Default Certificate
If certificates have been set up, select the certificate to be awarded for finishing this course.
Course Content
The information to go on the course page will be added here.
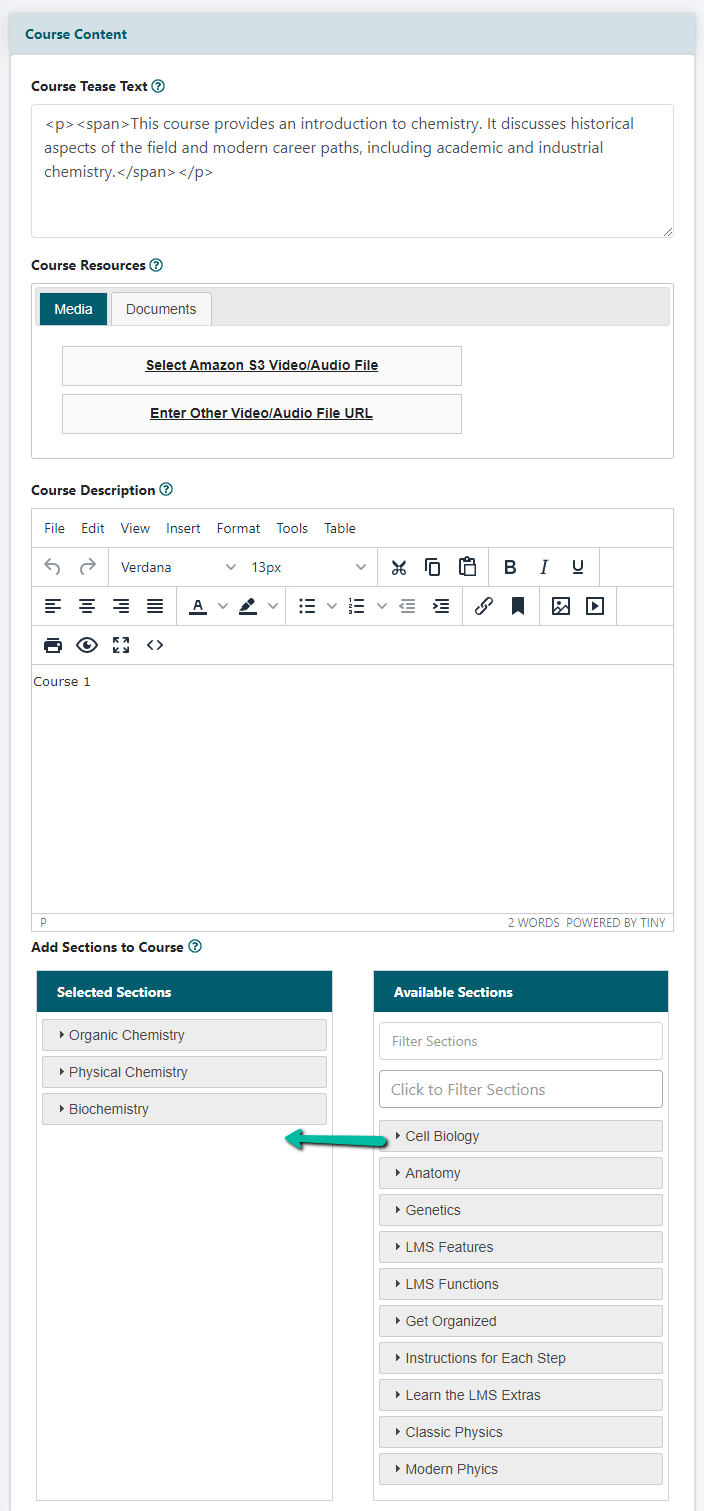
Course Tease Text
Enter in Text for the Teaser Copy for the Course
In the 'Course Tease Text' field add a short summary of what the student will learn in the course.
The Course Tease Text will appear for the user under the courses available in the degree or in the dashboard.
Course Resources
Media
Streaming a video or audio file directly from the Course Overview page is easy with the 'Course Resources' field. The video or audio file can be selected directly from an Amazon S3 account or through a URL to the file stored at any other storage location.
The software will automatically add the video or audio file to a player, and will display the player at the top of the Course page.
If you would like the player to display in a custom location on the course page, a |media| place holder can be used to move the player around the page.
Please click on each tab below for further information and instructions on adding a player to a Course page.
Select a Media File from an Amazon S3 Account
1. To Stream a Video or Audio File Directly From the Course Description Page, select the Media tab from the 'Course Resources' field.
2. Click on the Select Amazon S3 Video/Audio File link. This will open up your folders stored at Amazon S3.
3. Click on the folder where the audio or video file is located.
4. Click on the File Name of the video or audio file.
5.The full url of the stored file will appear under the media options. This is the video or audio file that will appear on the course description page.
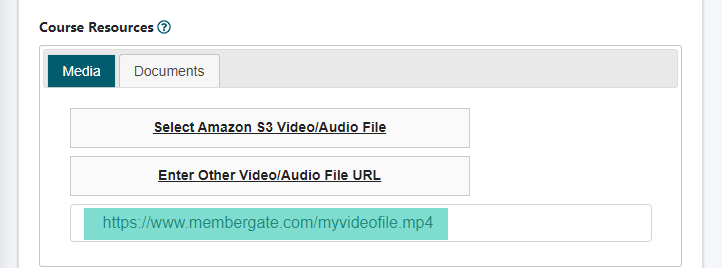
Stream a Media File from any Other Cloud or Storage Area
1. To Stream a Video or Audio File Directly From the Course Description Page, select the Media tab from the 'Course Resources' field.
2. Click on the Enter Other Video/Audio File URL link. A new text field will open.
3. Enter in the URL of the video or audio file in the new text field.
Documents
Adding downloadable companion files or recources directly from the Course Description is easy with the 'Course Resources' field. The file or files for downloading can be selected directly from an Amazon S3 account, through a URL for the file stored at any other storage location or uploaded directly to the editing Course Edit page.
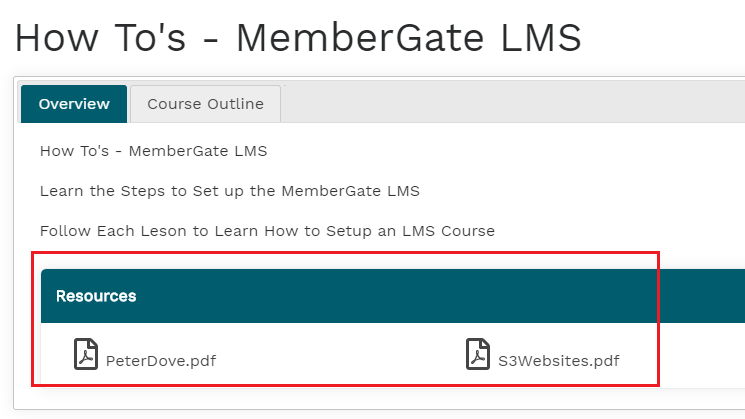
The software will automatically add files to the Course as additional Resources and will display the files at the bottom of the Course Overview page.
Available File Types
The file types that can be offered as download files are: pdf, doc, docx, xls, xlsx, zip
Please click on each tab below for further information and instructions on adding a player to a Course Description Page.
Include Downloadable Files Stored at an Amazon S3 Account
1. From the 'Course Resources' field, click on the Documents tab.
2. Click on the Select Amazon S3 Document File link. This will open up your folders stored at Amazon S3.
3. Click on the folder where the downloadable resource is stored.
4. The files available in the directory will be displayed.
5. Click on the name of the file(s) to be downloaded with this Course. More than one file can be chosen. The selected files will appear below the listing.
Upload Files Directly through the Courses Edit Page
1. From the 'Course Resources' field, click on the Documents tab.
2. Click on the Upload Document File link. A box will open for you to select the file from your local drive.
Include Downloadable Files Stored at any Other Cloud or Storage Area
1. From the 'Course Resources' field, click on the Documents tab.
2. Click on the Enter Other Document File URL link.
3. A new field will appear. Enter the URL of the stored document to be available for download for this Course in the box and click on the + sign to add it.
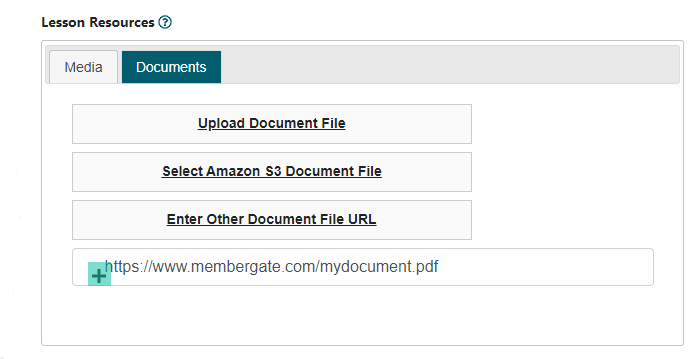
4. Additional files can be added using the same steps as in step 3. After clicking on the + sign, the added files will appear under the listing.
The Results
Any files that are available as extra resources for the Course and can be downloaded along with the Course will appear at the bottom of the Course Overview page.
The user will be able to access the downloadable files when reaching the end of the Course Description.
Course Description
The main text and graphical content for the Course Description can be added to the Course Description field. If the WYSIWYG editor is enabled for the site, it will appear here as well. The WYSIWYG editor can be used for additional formating of the description text.
Add Sections to Course
Filter Sections
Under the 'Available Sections' section, add a tag or text to filter the sections to select for this course.
Add Sections to the Course
Existing sections are listed in the 'Available sections' section. Click on the name of the section to add it to the course and drag and drop it into the 'Selected Sections' box.
Organize Sections
Sections in the 'Selected Sections' box can be arranged by clicking on the name of the section and dragging and dropping it where it should appear in the selected sections listing.
Removing Sections from the Course
Current sections can be removed from the course. Click on the name of the section to remove from the 'Selected Sections' box and drag and drop it into the 'Available Sections' box.
Course Images
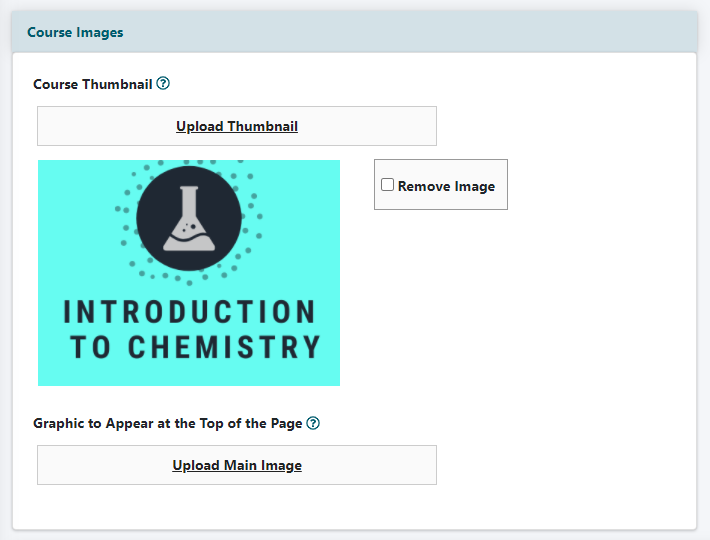
Course Thumbnail
A thumbnail image can be added to the course name. The thumbnail will be displayed on the Degree Course Listing page.
- Click on the Upload Image
- Choose the image from your local drive.
Graphic to Appear at the Top of the Page
The graphic shown at the top of the Course Description is considered the 'Main Graphic.
The main graphic can be uploaded to the site through the 'Graphic to Appear at the Top of the Course' field.
- Click on the Upload Main Image
- Choose the image from your local drive.
Display
Click on the Display box to open the section.
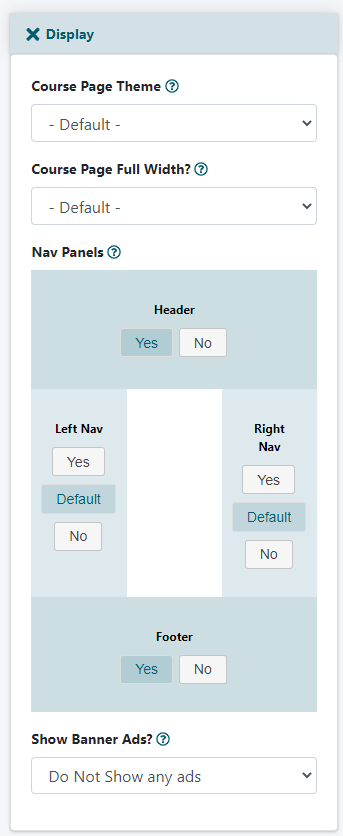
Course Page Theme
If a different theme is desired for this page, select it from the drop down menu.
Course Page Full Width
By default the page width is that set by the theme. If the page width should span the full width of the screen select 'full width' from the drop down menu.
Nav Panels
Click the Yes or No buttons to include or remove the specific nav panels on the lesson page. Choosing Default will take on the properties set in 'Master Template'.
Show Banner Ads
If banner ads should be shown select which ones from the drop down menu. The banner ads are added to the site via 'Edit Site Descriptions' in the Public and Member Top and Bottom Banner Ad Script boxes.
Department Settings
Click on the Department Settings box to open the section.
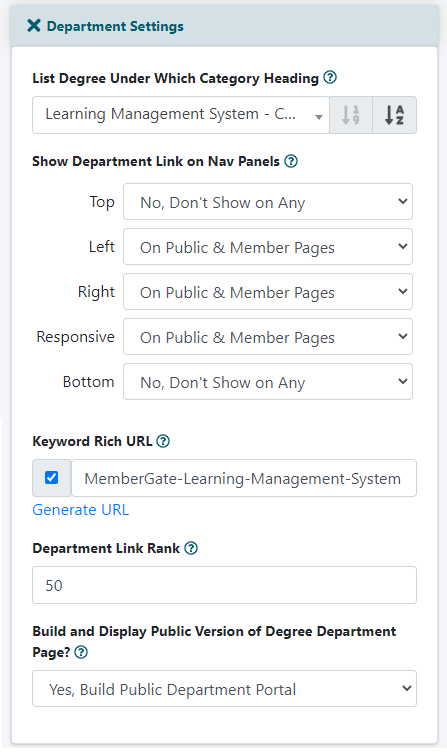
List Course Under Which Category Heading
The direct link to the Course can be automatically added to the navigational bars. If you would like the link to appear in a nav bar, choose an active category that is set to appear on your nav bars. The link to the Course information page will be published under that category.
If you do not want the link to the Course to appear on your nav bars, add it to an inactive category (or one that is set not to appear on the navigational bars).
Show Department Link on Nav Panels
From each drop down menu, choose if you would like the course link to appear in that nav bar. It will only appear if the category is also set to show.
Keyword Rich URL
Click the box to have a keyword rich url for this page. Enter custom keywords, or generate one based on the course headline.
Department Link Rank
The department link rank arranges where on the listing of other departments and courses where this course will appear.
The ranking can be from 01-99. The lower number will appear higher on the listing, a higher number will move the department link lower on the list.
Build and Display Public Version of Course Department Page
Setting this to Yes, Build Public Version will gives access to the public to be able to view the course names. Only members will be able to click on the links and read the entire article.
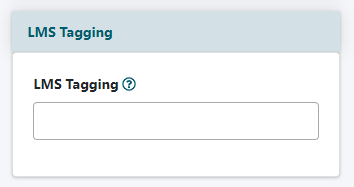
LMS Tagging: Enter Tags for this Course
Adding tags to each course can be important when setting up lessons, sections, courses, and degrees. It helps you to set up a filter so the content can be found easily when setting up other areas of the LMS
In the LMS Tagging field, enter the tags associated with this Course. If the tag has already been created, choose it from the listing which will appear once you begin typing in the box.
The Course can be saved by selecting the button or button found at the very bottom of the Course editing page.