Tutorial
The add and edit department options let you add to or edit existing departments on a MemberGate site.
Adding a Department can be found under Content Departments Add Department
Click on each section to expand the section and learn more about the setting when adding or editing a department page.
Departments
A Department is a container for your content pages. Content pages of like topics can be added to the same department.
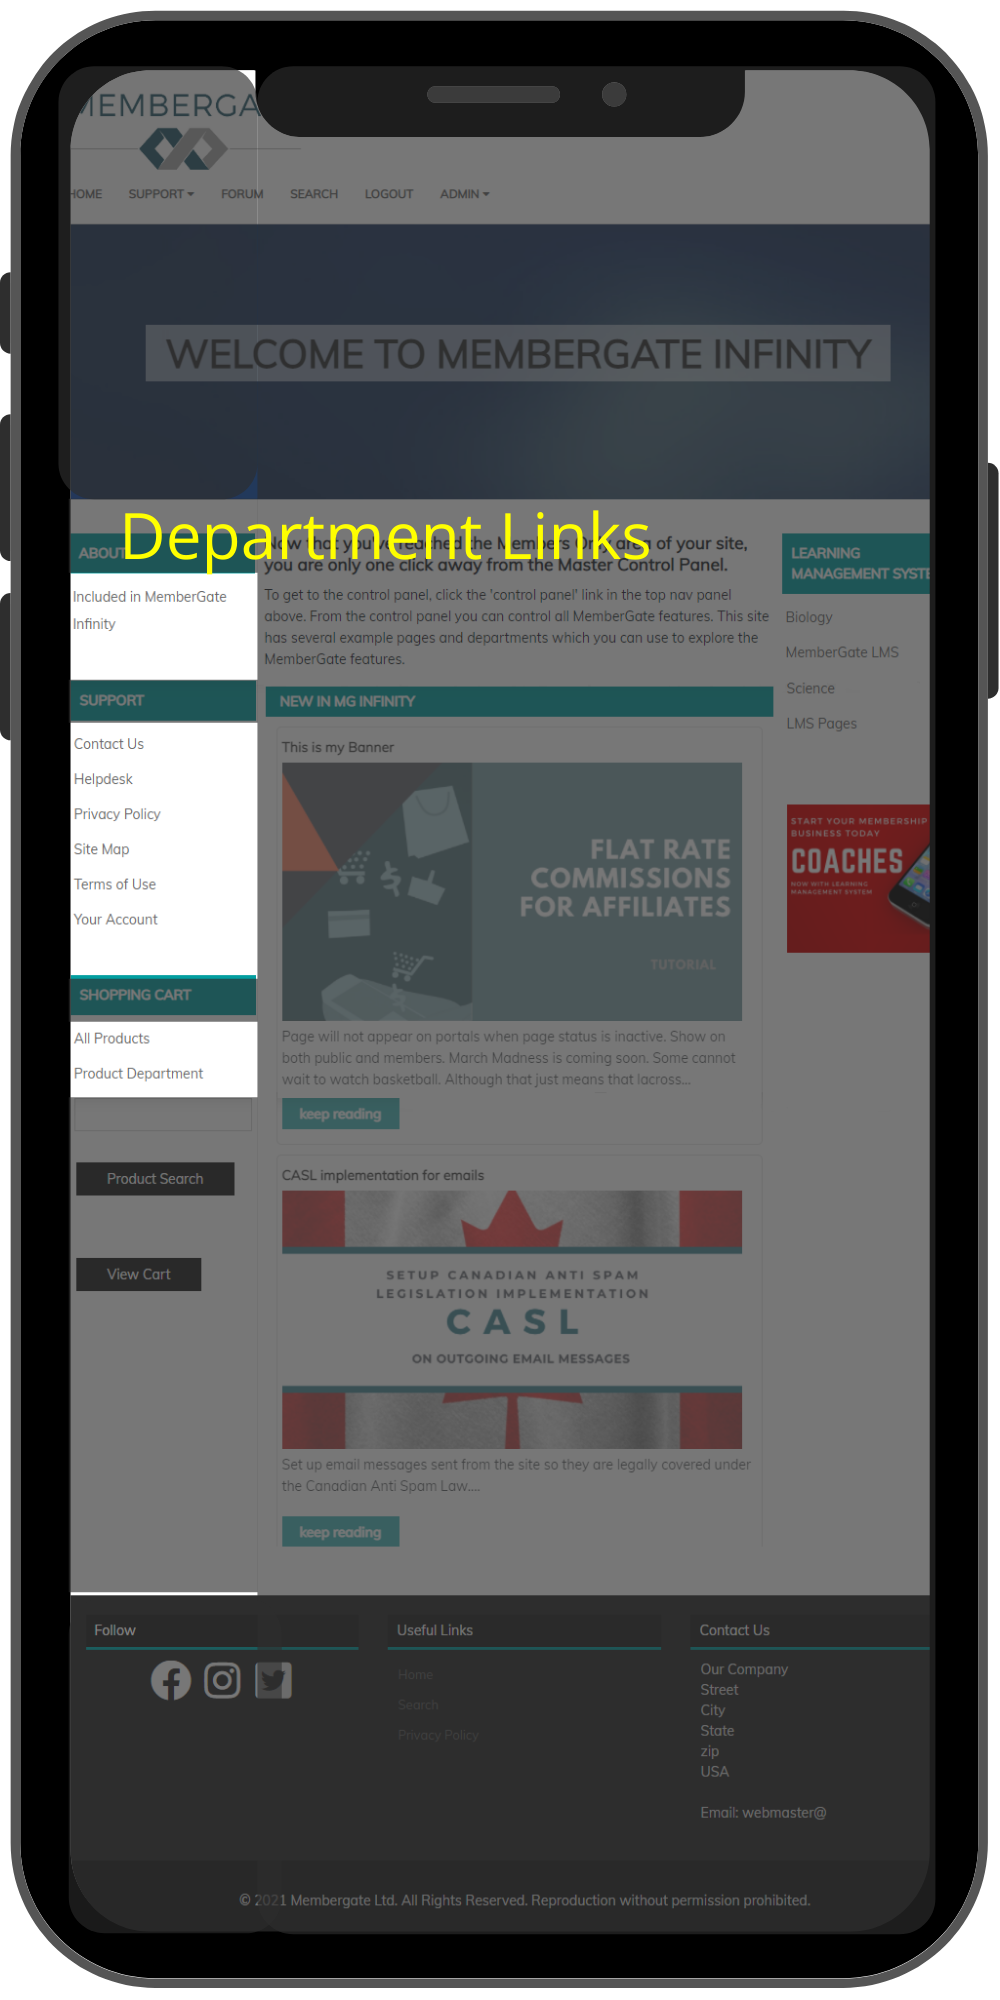
Links for Departments appear on your navigational panels and provide a convenient way to organize articles based on subject matter.
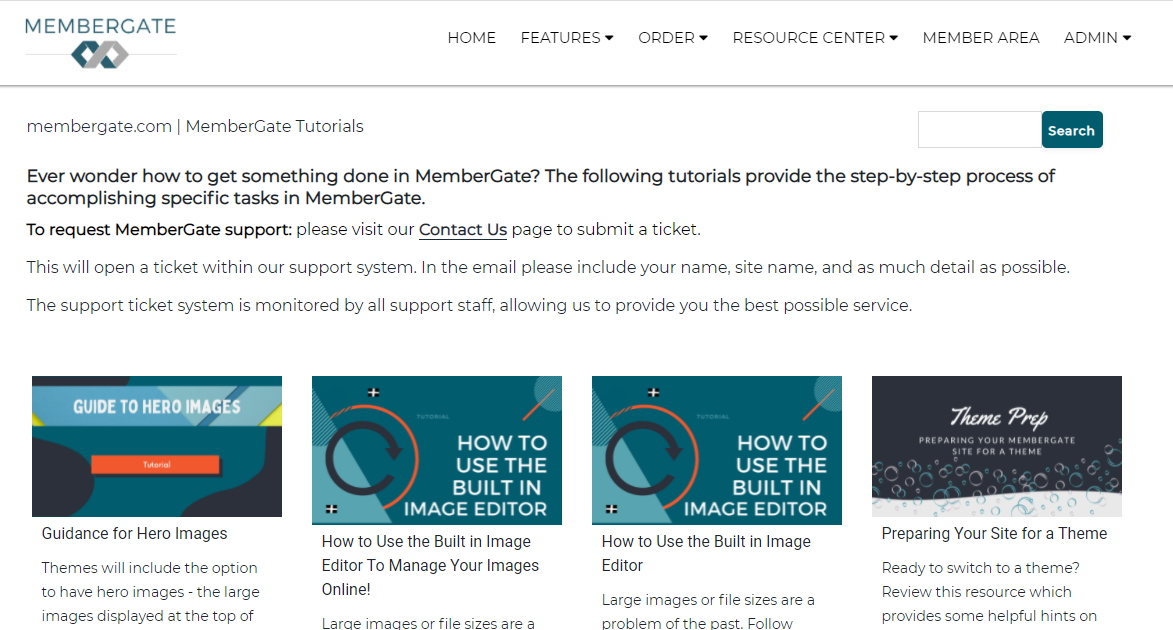
Example Department Main Page
Department Content
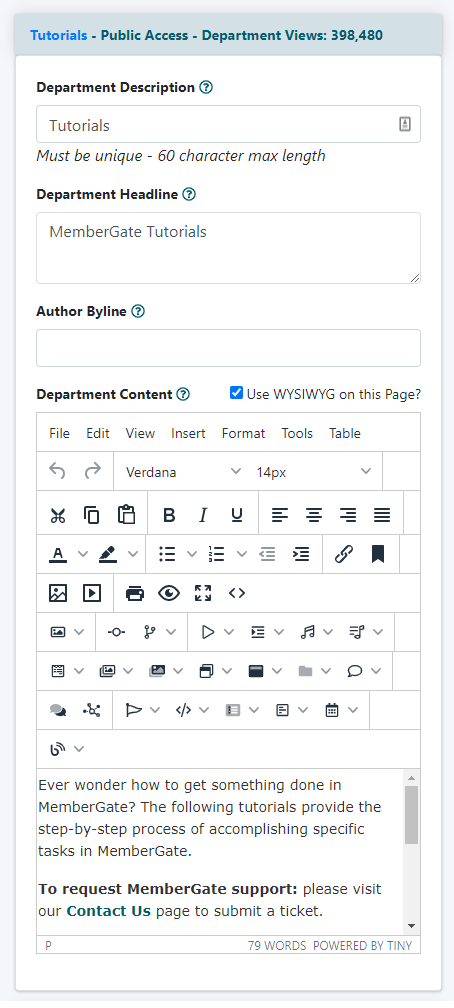
Department Description
The name of the department is added to the 'Department Description' field. This is the text that will automatically be published as a link in the nav panels.
Department Headline
The headline for the department page can be added here.
It is shown at the top of the department's main page.
Author Byline
Enter a byline for the department (optional)
The byline will appear under the headline on the page
Department Content
The main text and graphical content for the main department page can be added to the 'department content' field. If the WYSIWYG editor is enabled for the site, it will appear here as well. The WYSIWYG editor can be used for additional formatting of the page text.
The teaser blurbs for the content pages within this department can be seen below the department content.
Images
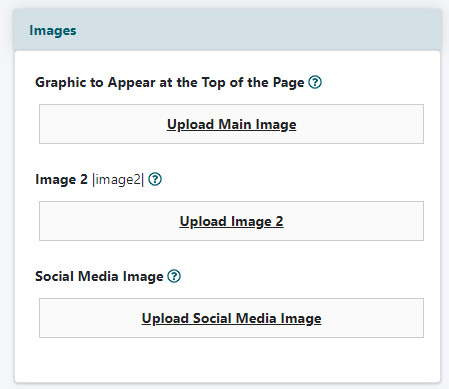
Graphic to Appear at the Top of the Page
The graphic that can be shown at the top of the page is considered the 'Graphic to Appear at the Top of the Page'.
Click on Upload Main Image and choose the image from your local drive.
Image 2
Images to be shown on the department pages can be uploaded through the image placeholders - Image 2 through Image 20.
Click on the Upload Image and choose the image from your local drive. A new placeholder will appear to upload other images.
Place the image within the department content box using the appropriate image placeholder. The image placeholder can be added where you would like the image to appear. |image2|, |image3| etc
Social Media Image
The graphic that can be shared on social media sites can be uploaded.
Click on the Upload Social Media Image and choose the image from your local drive.
Department Content Listings
Click on the Department Content Listings box to open the section.
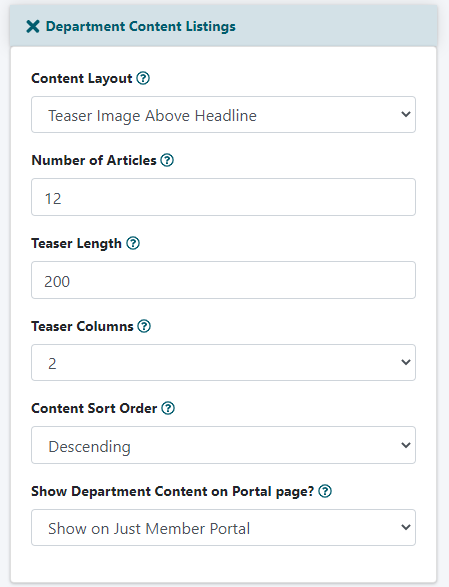
Content Layout
The layout option sets the way the content page tease blurbs will be display content on the department page. The headline and teaser copy can be adjusted so it shows above, below or next to the the teaser image in linear design, or the published content teasers can be automatically published in a grid with the headline and teaser copy below the teaser image.
Number of Articles
The number of page headlines/teaser blurbs to display on the main page of the department can be controlled by adding a number 'x' where x is number of headlines that should be published.
Teaser Length
Enter a number of characters to appear in the teaser blurb of the content pages published on the department page. If there is not a custom tease written for a page, this number of characters of tease from the top of the content of the page will be shown. Set this to 0 to only show the headline of the content page.
Teaser Columns
Select 1 or 2 from the drop down menu to layout the published teaser blurbs in one column or two columns on the department main page.
Content Sort Order
Select 'ascending' or 'descending' from the drop down menu. Ascending means that the content pages will be displayed from the content page with the earliest date first and the most recent pages will be published last. Descending means that content pages will be arranged from the most recent dates shown first.
Show Department Content on Portal page
Select 'yes' or 'no' from the drop down menu to decide whether to automatically publish content pages within the department on the public or member portal pages. (This is also dependent on the portal page display settings.)
Settings
Click on the Settings box to open the section.
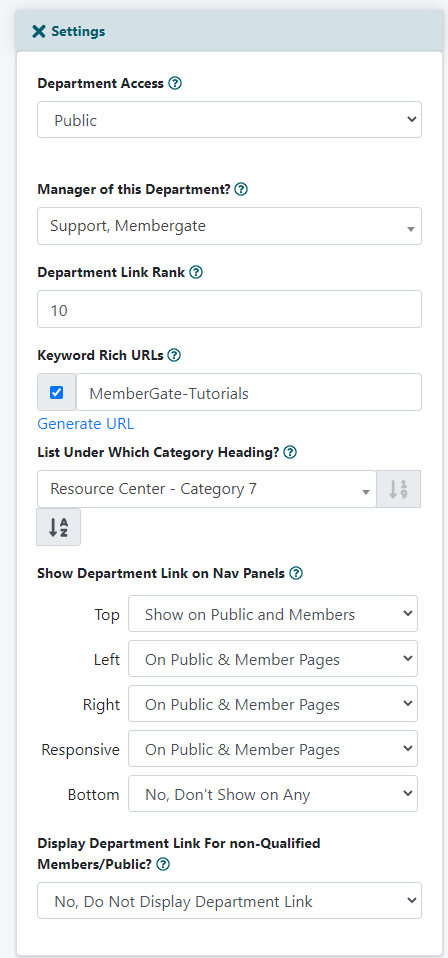
Department Access
Choose who can access the department. The 'Department Access' is set for whether it's for public or members only.
Manager of this Department
Select the admin manager for this department from the drop down menu.
Department Link Rank
The link rank is the setting that will arrange where this department will appear on the nav panels. The link rank can be entered as a number from 01-99. The lower number will show the department at the top of the left/right nav, or to the left of the top/bottom navs
Keyword Rich URLs
Click the box to have a keyword rich url for this page. Enter custom keywords, or generate one based on the page headline.
List Under Which Category Heading
Choose which category heading it is to appear under. The categories can be set up in the control panel of MemberGate (under the 'Categories' section).
Show Department Link on Nav Panels
The department link can appear in the navigation panels - whether they are on public pages, member pages, shopping cart pages or any combination.
A department can be set to appear in a drop down menu on the top nav. It will only appear in the top nav when it's category has been set to appear in the top nav as a drop down menu.
Display Department Link For non-Qualified Members/Public
Choose 'yes' or 'no' from the drop down menu. If a department is a members only department, selecting yes will allow non members access to the department main page so they could see the tease blurbs from the content within this department. A non-member would not be able to view the content pages without logging in.
Display
Click on the Display box to open the section.
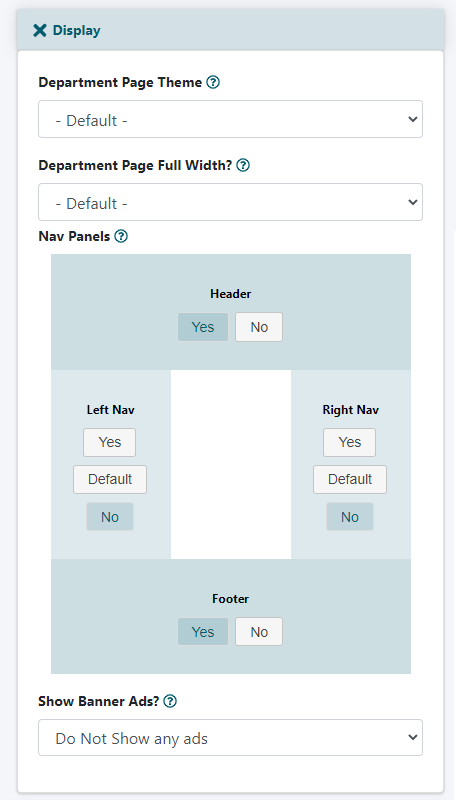
Department Page Theme
If a different theme is desired for this page, select it from the drop down menu.
Department Page Full Width
If the page width should span the full width of the screen select full width from the drop down menu. Otherwise, it will show at the width set at the theme level.
Nav Panels
Click the Yes or No buttons to include or remove the specific nav panels on the lesson page. Choosing Default will take on the properties set in 'Master Template'.
Show Banner Ads
If banner ads should be shown select which ads from the drop down menu. The banner ads are added to the site via 'Edit Site Descriptions' in the 'Public and Member Top and Bottom Banner Ad Script' boxes.
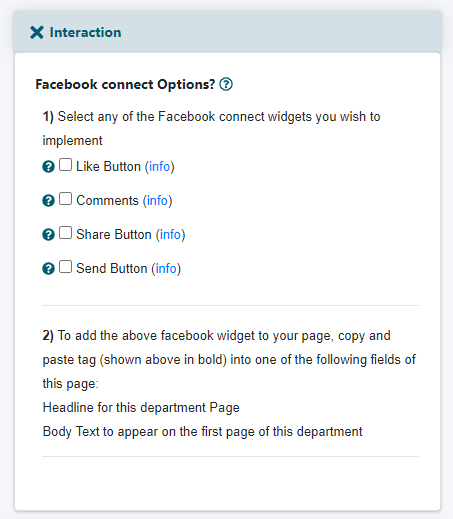
Interaction
Choose the social media interaction for this page. Any social media options do need to be connected to your site. This can be completed in the right nav of the control panel under API Settings.
Click on the Interaction box to open the section.
Advanced
Click on the Advanced box to open the section.

Custom Title & Meta Tags
Check the box to input custom title, meta keywords or meta descriptions.
After the box is checked, new fields will open. Enter the meta title, keywords (separated by commas) or meta description.
Custom Scripts & Styles
Check the box to input custom scripts and/or styles.
After the box is checked, new fields will open. Anything that is necessary for the header can be added to the 'custom header' box. Anything that is necessary for the footer can be added to the 'custom footer' box.
Indexing Options
Select any desired actions to take for indexing the department content.
Alternate Link URL
If the user should be redirected to a different page when clicking on the department link, enter that url here.
New Window
This is for the alternate link url. If the department link should be opened in another browser window, select 'yes' from the drop down menu. If the page can open in the same browser window, choose 'no'.
Add this Department
When completed, click the button. A preview of the page can be seen.