Assessments can be added to the end of desired lessons. An assessment can be used as a completion action - this means the user cannot move on to the next lesson until they take the survey.
There are three steps to take in order to add an assessment:
- Add/Edit Questions
- Create the Assessment
- Assign the Assessment to a Lesson
Click on each tab below for instructions to complete each of the steps.
1. Add/Edit Questions
The first step to make an assessment is to create the questions that will be included in the assessment. Follow the instructions below to learn how to add questions.
Questions
Editing LMS Questions can be found under Content LMS Questions
To Create a New Assessment Question
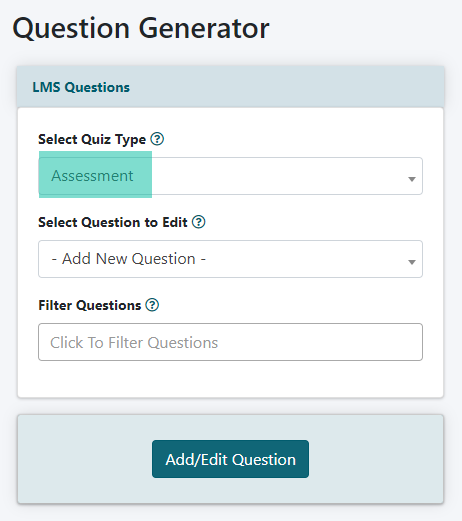
- In the 'Select Quiz Type' field Choose 'Assessment' from the drop down menu
- In the 'Select Question to Edit' field Choose '-Add New Question' from the drop down menu
- Click the button
To Edit an Existing Assessment Question
- In the select quiz type field choose 'Assessment' from the drop down menu
- In the 'Select Question to Edit' field, click on the drop down menu, and select the Assessment Question to Edit
OR TO FIND THE ASSESSMENT QUESTION FASTER - Click in the drop down menu and begin typing a keyword in the Assessment Question. The software will pare the list to only those Lessons with the keywords. Select the Assessment Question to Edit
- Click the button
Click on each section to expand for further instruction.
Question Setting
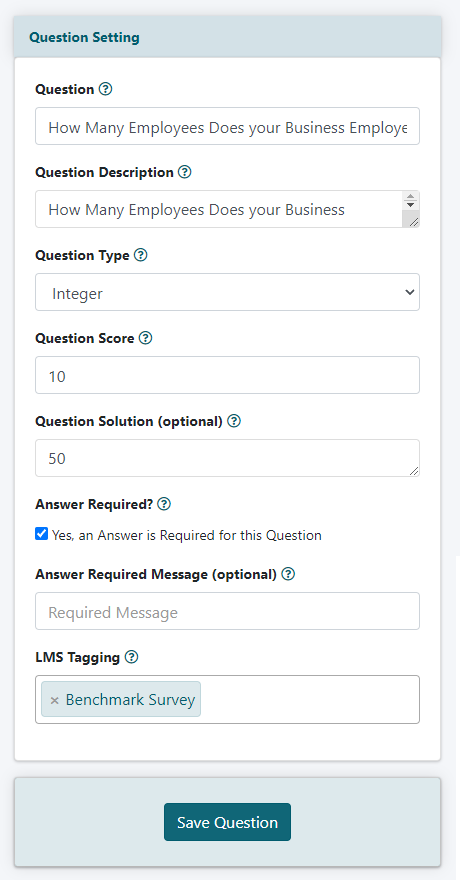
Question
Enter the question.
Question Description
If it is necessary to include more information about the question, enter that here. This is an optional field.
Question Type
Select a 'Question Type' from the drop down menu
The question type field includes the type of answer options that the user will have in order to select or input the correct answer for the question.
Click on each section below to expand for more instructions for each Question Type.
Question Score
A user can earn points for answering this assessment question. Enter a numerical value for the number of points the user can earn.
Question Solution
If the user reviews the assessment, they will be able to see the actual answer along with any other details that can be included using the Question Solution field. This is an optional field.
Answer Required
If the user is required to answer the question, check the box for the 'Answer Required' field. Otherwise, the user will be able to skip the question.
Answer Required Message
If the user doesn't answer the question, they will see a message that let's them know they have to answer the question. There is a default message, but if you would like a custom message enter it in the 'Answer Required Message' field.
LMS Tagging
Adding tags to each question can be important when setting up quizzes, surveys and assessments. It helps you to set up a filter so the content can be found easily when setting up the tracking options.
In the LMS Tagging field, enter the tags associated with this Question. If the tag has already been created, choose it from the listing which will appear once you begin typing in the box.
Question Types
Click each tab to learn more about the question type.
Radio Button Answers
Only one option can be selected when using a radio button option. The user will be able to click on the button for the answer that they would like to submit.
Answers
Enter an answer option for the question.
Add Additional Answers
Click the Add Answer button for each additional answer that should be included.
Enter a new answer and repeat the steps as necessary.
Select/Drop Down Answers
Only one correct answer can be selected when using a select/drop down option. The user will be able to select the correct answer from a drop down menu.
Answers
Enter an answer option for the question.
Add Additional Answers
Click the Add Answer button for each additional answer that should be included.
Enter a new answer and repeat the steps as necessary.
Checkbox Answers
Multiple options can be selected when using a Checkbox option. The user will be able to click all of the buttons for all of the options that they would like to submit.
Answers
Enter an answer option for the question.
Add Additional Answers
Click the Add Answer button for each additional answer that should be included.
Enter a new answer and repeat the steps as necessary.
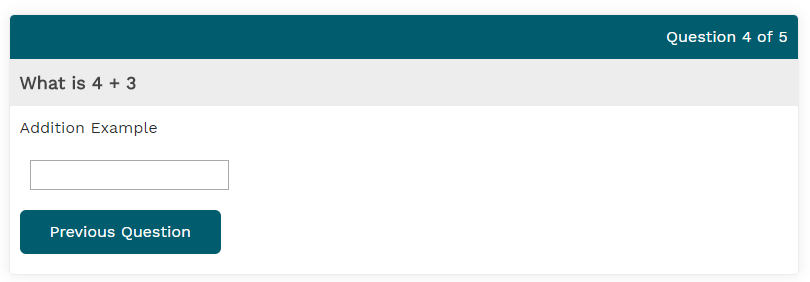
Decimal Answers
Only one option can be input when using the integer option. The user will be able to input their option into a text box.

Question Score
A user can earn points for answering this survey question. Enter a numerical value for the number of points the user can earn.
Integer Answers
Only one option can be input when using the integer option. The user will be able to input their option into a text box.
Question Score
A user can earn points for answering this survey question. Enter a numerical value for the number of points the user can earn.
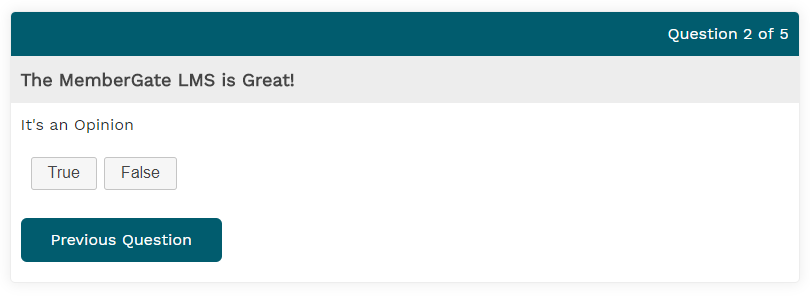
True/False Answers
The user will select if the question is accurate (true) or inaccurate (false).
Question Score
A user can earn points for answering this survey question. Enter a numerical value for the number of points the user can earn.
Save the Question
The Question can be saved by selecting the button found at the very bottom or the Question settings page.
2. Create the Assessment
The second step is to create the actual assessment. Follow the steps below to create the Assessment. Click each section to expand for further instruction.
Assessment
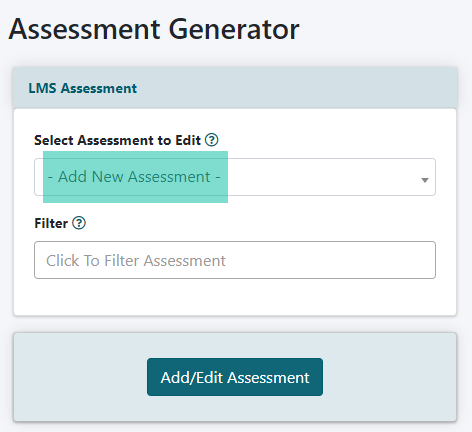
Editing an LMS Assessment can be found under Content LMS Assessments
To Create a New Assessment
- Choose '-Create New Assessment' from the drop down menu
- Click the button
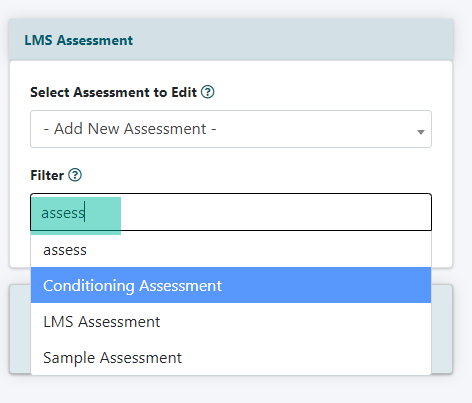
To Edit an Existing Assessment
- Click on the drop down menu, and select the Assessment to Edit
OR TO FIND THE ASSESSMENT FASTER - Click in the drop down menu and begin typing a keyword in the Survey. The software will pare the list to only those assessments with the keywords. Select the Assessment to Edit
- Click the button
Assessment
Assessment Name
Enter a Name for the Assessment
Assessment Description
A Description for the Assessment can be entered into the 'Assessment Description' box.
(This field is not currently in use).
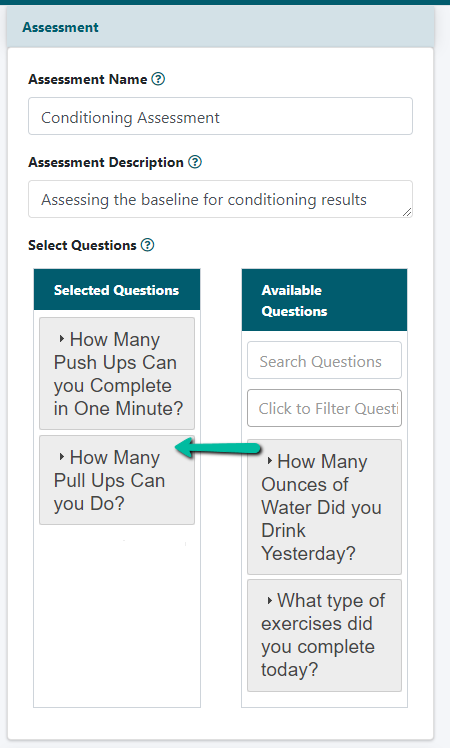
Select Questions
Filter Questions
Under the 'Available Questions' section, add a tag or text to filter the Questions to select for this asssessment.
Add Questions to the Assessment
Existing questions are listed in the 'Available Questions' section. Click on the name of the question to add it to the assessment and drag and drop it into the 'Selected Questions' box.
Organize Questions
Questions in the 'Selected Questions' box can be arranged by clicking on the name of the question and dragging and dropping it where it should appear in the selected questions listing.
Removing Questions from the Assessment
Current questions can be removed from the assessment. Click on the name of the question to remove from the 'Selected Questions' box and drag and drop it into the 'Available Questions' box.
Assessment Settings
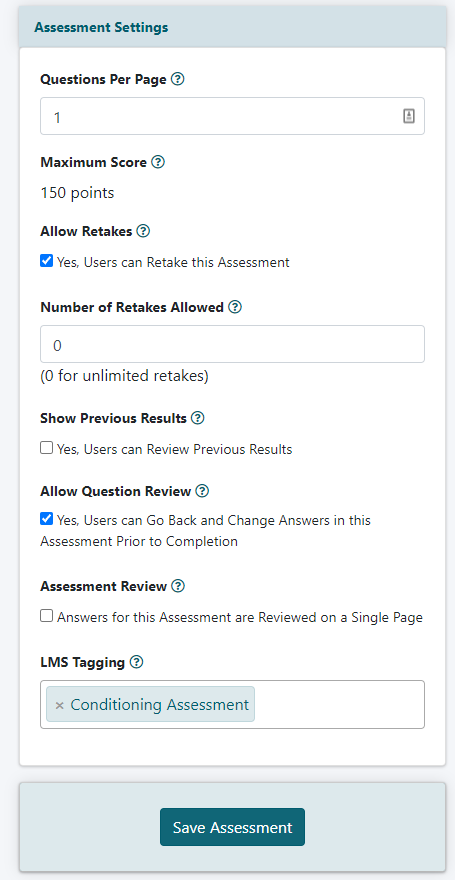
Questions Per Page
Enter the number of questions to appear on a page at one time.
The number of questions appearing per page can be set. This allows the user to see many questions at one time, or have to click through each page to see the next questions.
Allow Retakes
A user may wish to retake the assessment to earn a higher or passing score. If you would like to allow the user to retake the assessment check the 'Yes, Users Can Retake the Assessment' box.
Number of Retakes Allowed
If retakes are allowed, set the number of allotted retakes.
A maximum number of times that a user can retake a assessment can be set. Enter the maximum number of times the user can retake the assessment in the 'Number of Retakes Allowed' box. If there is no upper limit of retakes allowed, set the number of retakes to 0.
Show Previous Results
Check the box to allow the user to review other past results/scores from this assessment.
Allow Question Review
Set if the user can go back and review past questions and change answers if desired.
After answering a question and moving on, the user can have the opportunity to go back and review past questions. They may also change their answers for those questions as well. If the user is able to go back to review and re-answer questions, check the box for 'Allow Question Review'
Assessment Review
Set if the user can review the questions on a single page after completion.
After the assessment is completed, the user can have the option to review their questions on a single page. If this option is desired, check the 'Answers for this Assessment are Reviewed on a Single Page' box.
LMS Tagging
Adding tags to each assessment can be important when setting up lessons, sections, courses, and degrees. It helps you to set up a filter so the assessment can be found easily when setting up other areas of the LMS.
In the LMS Tagging field, enter the tags associated with this Assessment. If the tag has already been created, choose it from the listing which will appear once you begin typing in the box.
Save the Assessment: Click the 'Save Assessment' Button
The Assessment can be saved by selecting the button found at the very bottom of the Assessment editing page.
Assign the Assessment to a Lesson
The final step is to assign the assessment. This is completed at the Lesson level.
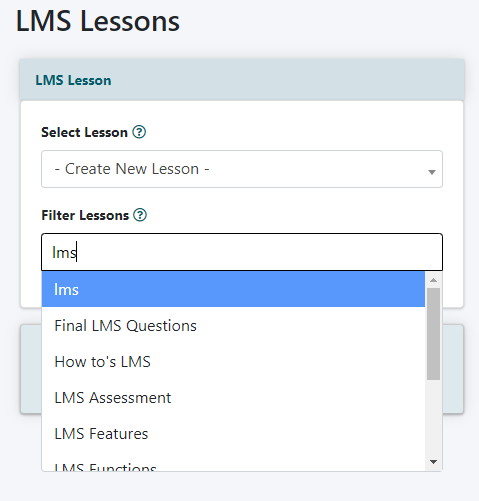
LMS Lessons
The LMS Lessons can be found under Content LMS Lessons
Select the Lesson
- Click on the drop down menu, and select the Lesson to Edit
OR TO FIND THE LESSON FASTER - Click in the drop down menu and begin typing a keyword in the Lesson. The software will pare the list to only those Lessons with the keywords. Select the Lesson to Edit
- Click the button
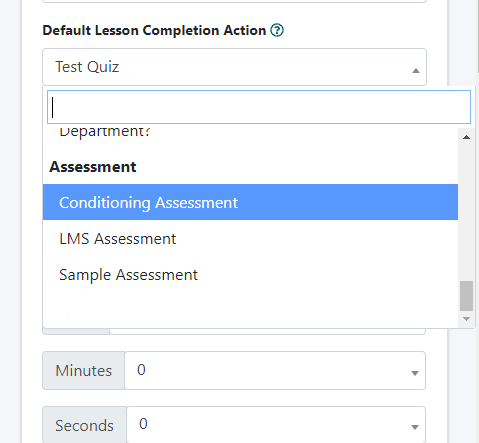
Default Lesson Completion Action
In the 'Default Lesson Completion Action' field , select the desired Assessment name from the drop down menu to add to the end of the Lesson.