
Tutorial
TUTORIAL: How to Manage the Updated MemberGate Blog
The updated MemberGate blog system includes a more complete set of tools for creating, organizing, publishing, and managing blog content.
Use the tutorials below to learn how to configure your blog, create and edit blog entries, organize posts with categories, and moderate reader comments. The updated blog also includes support for SEO-friendly links, archives, easier image uploads, and automatic image resizing, giving you more flexibility in how your blog is managed and presented.
Each tab covers a different part of the blog management process, so you can jump directly to the area you need.
The blog setup controls the blog name, RSS information, comment settings, SEO-friendly link structure, blog manager, status, and how many entries display per page.
1. Name the Blog
Add the blog title and RSS description so the blog can be identified by visitors and feed readers.
2. Choose Interaction Settings
Decide whether readers can comment, whether comments need approval, and how conversations should display.
3. Configure Blog Settings
Set the blog home page, SEO-friendly links, RSS feed, blog manager, status, and entries per page.
Step 1: Open Add/Edit Blog
Blog setup can be found under Content Blogs Add/Edit Blog.
Use this screen to create a new blog or edit the settings for an existing blog.
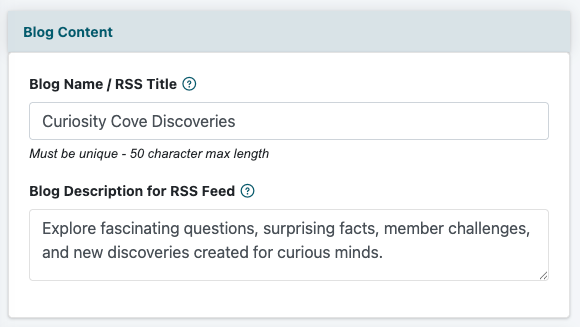
Add the blog name and RSS description in the Blog Content section.
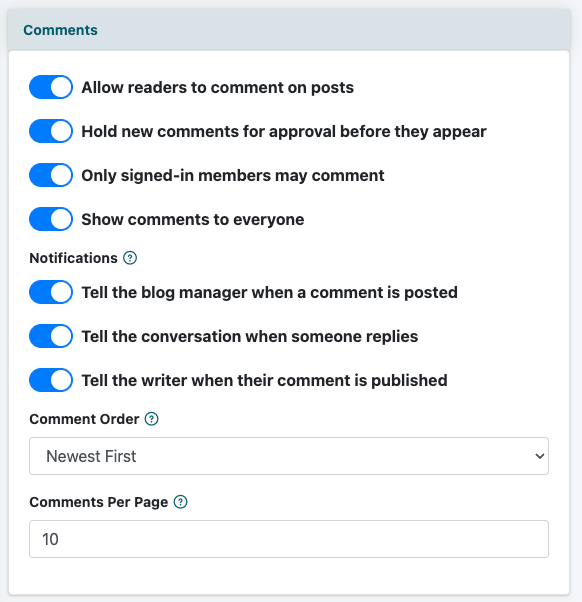
Use the Comments section to control reader comments, moderation, notifications, and comment display.
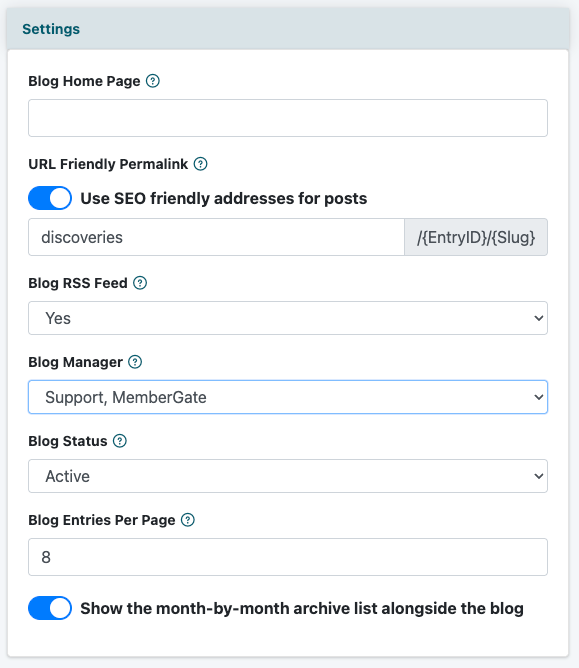
Use the Settings section to configure the blog home page, SEO-friendly links, RSS feed, manager, status, and entries per page.
Step 2: Add the Blog Content
The Blog Content section includes the basic information used to identify the blog.
| Field | What to Enter |
|---|---|
| Blog Name / RSS Title | Enter the blog name or title. This name is used for the blog and for the RSS feed title. The blog name must be unique and can be up to 50 characters long. |
| Blog Description for RSS Feed | Enter a short description for the blog. This description can appear with the blog and in RSS feed readers. Keep the description clear and simple. Do not use HTML or special characters in this field. |
Step 3: Configure Comment Settings
The Comments section controls whether readers can comment on blog posts and how those comments are handled.
| Setting | What It Controls |
|---|---|
| Allow readers to comment on posts | Turn this option on if you want readers to be able to leave comments on blog posts. |
| Hold new comments for approval before they appear | Turn this option on if comments should be reviewed before they are published on the site. |
| Only signed-in members may comment | Turn this option on if commenting should be limited to logged-in members. |
| Show comments to everyone | Turn this option on if published comments should be visible to all visitors. |
| Tell the blog manager when a comment is posted | Turn this option on if the blog manager should receive an email when a new comment is posted. |
| Tell the conversation when someone replies | Turn this option on if people participating in a comment conversation should be notified when someone replies. |
| Tell the writer when their comment is published | Turn this option on if the person who wrote a comment should be notified when their comment is approved and published. |
| Comment Order | Select how comments should be displayed. Options include Newest First, Oldest First, and Most Recent Activity. |
| Comments Per Page | Enter the number of comment conversations to show on each page. |
Step 4: Configure Optional Interaction Settings
The Interaction section includes optional settings for additional comment and social features.
| Setting | What It Controls |
|---|---|
| Show Facebook Likes | Turn this option on if you want Facebook Likes to appear with blog entries. |
| Show Facebook Comments | Turn this option on if you want Facebook Comments to appear with blog entries. Additional fields allow you to set the comments width and comment count. |
| Show Disqus Comments Inline | Turn this option on if you want Disqus comments to display inline with blog entries. |
| Show Disqus Comments at the Bottom | Turn this option on if you want Disqus comments to display at the bottom of blog entries. |
Step 5: Configure Blog Settings
The Settings section controls the blog's page location, SEO-friendly URLs, RSS feed, manager, status, and entry display settings.
| Field | What to Enter or Select |
|---|---|
| Blog Home Page | Enter the blog home page address if the blog is being displayed on a department or content page. This field is optional. The blog will still have its own page if this field is left blank. |
| URL Friendly Permalink | Turn on Use SEO friendly addresses for posts if you want blog entries to use cleaner, more readable URLs. |
| Blog Folder | Enter the folder name that should be used as part of the blog post URL. For example, a folder such as discoveries can help create cleaner blog post addresses. |
| Blog RSS Feed | Select whether an RSS feed should be automatically created for this blog. |
| Blog Manager | Select the person who will manage this blog. The blog manager is the person who can create entries for the blog. |
| Blog Status | Select whether the blog should be Active or Inactive. |
| Blog Entries Per Page | Enter the number of blog entries that should display on each blog page. |
Step 6: Save the Blog
After the blog content, comment options, interaction options, and settings have been configured, save the blog.
Saving the blog creates the blog area and makes it available for blog entries.
Step 7: Add the Blog to a Content or Department Page
A MemberGate tag is provided on the resulting screen. Copy this tag and paste the tag into the main bod of a content or department page. Any blog entries that are created will automatically populate on that page.
After the blog has been created, individual blog entries can be added to the blog.
The blog setup controls how the blog works overall. Blog entries are the individual posts that appear inside the blog.
Create the blog first, then add blog entries to publish posts, updates, articles, announcements, or other content within that blog.
After a blog has been created, individual blog entries can be added to that blog. Blog entries are the posts, articles, announcements, updates, or other content that appear inside the blog.
The Add/Edit Blog Entry screen allows you to enter the blog entry headline, keyword rich URL, author, excerpt, blog content, images, publishing settings, visibility, and categories. These settings control how the blog entry appears on the blog index, in search results, when shared, and on the full blog entry page.
A blog must be created before entries can be added to it.
1. Identify the Entry
Add the headline, keyword rich URL, author, and excerpt so the blog entry is easy to identify, browse, and share.
2. Add Content and Images
Write the blog entry content and upload images that should appear with the entry.
3. Publish and Organize
Choose the status, active date, visibility, and categories that control when and where the entry appears.
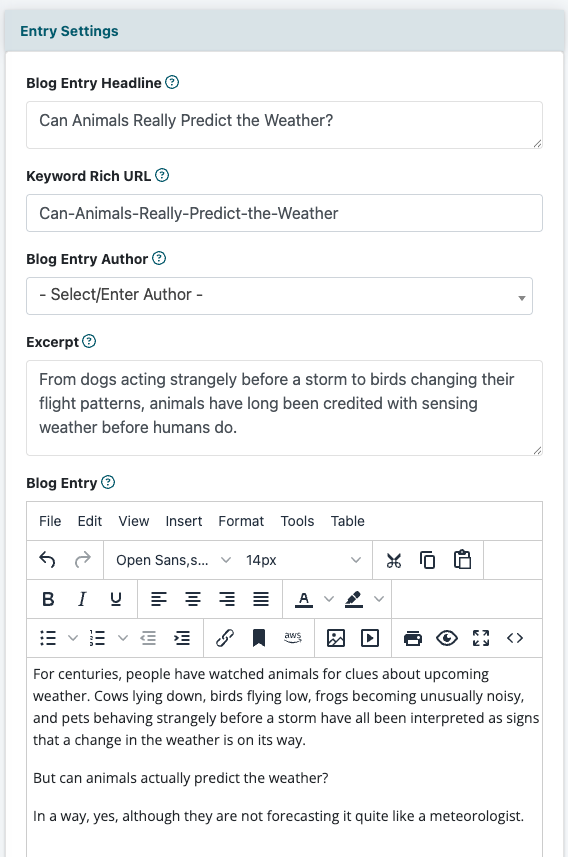
Use the Entry Settings section to enter the main information for the blog entry.
Step 1: Open Add/Edit Blog Entry
Blog entries can be found under Content Blogs Add/Edit Blog Entry.
Use this screen to create a new blog entry or edit an existing blog entry.
The blog entry is added to an existing blog, so the blog itself should be created before adding entries.
Step 2: Complete the Entry Settings
The Entry Settings section includes the main details used to create and identify the blog entry.
| Field | What to Enter |
|---|---|
| Blog Entry Headline | Enter the headline for the blog entry. This is the main title visitors will see for the post. |
| Keyword Rich URL | The keyword rich URL is the readable address for the blog entry. It is created from the headline as you type, unless you edit the field yourself. If this URL is changed after the entry is published, the previous address is kept as a permanent redirect. |
| Blog Entry Author | Select an existing author from the dropdown, or enter a new author name. |
| Excerpt | Enter a short summary of the blog entry. The excerpt can appear on the blog index, in search results, and as the description when the post is shared. If this field is left blank, the opening of the post will be used. |
Step 3: Add the Blog Entry Content
The Blog Entry field is where you enter the main text that should appear for the blog post.
This can include the full article, announcement, update, tutorial, or other content you want visitors to read.
Use the blog entry area to format the post content before saving and publishing the entry.
Step 4: Add Blog Entry Images
The Images section controls the images associated with the blog entry.
| Image Option | What It Controls |
|---|---|
| Featured Image | Upload the image that should appear alongside the excerpt on the blog index and at the top of the blog entry. If this field is left empty, the first image from the post images below can be used instead. |
| Social Share Image | Use this image area when you want to manage the image associated with social sharing for the blog entry. |
| Image Library | Upload additional images that can be used with the blog entry. |
Step 5: Choose the Blog Entry Status and Active Date
The Settings section controls whether the blog entry is published, scheduled, saved as a draft, or inactive. It also controls the active date used for publishing and ordering blog entries.
| Setting | What It Controls |
|---|---|
| Blog Entry Status | Select the status for the blog entry. |
| Draft | Keeps the post out of the blog, out of search, and off the site until it is set to Active. |
| Scheduled | Publishes the post automatically once the Active Date is reached. |
| Active | Makes the post live based on the blog entry settings. |
| Inactive | Unpublishes a post that was previously live. The page is removed and the entry drops out of the search index. |
| Active Date | Set the date and time for the blog entry. For active posts, the active date is also used to help arrange entries on the blog page. A future active date by itself can keep a post ranked higher, but it does not delay publication unless the status is set to Scheduled. |
Step 6: Configure Publishing Options
The Publishing section controls who can view the blog entry and how the entry is organized within the blog.
| Setting | What It Controls |
|---|---|
| Visibility | Choose whether the blog entry should be public or members only. |
| Public | Public posts can be read by anyone and are indexed by search engines. |
| Members Only | Members-only posts require a login. Member-only posts are excluded from sitemaps. |
| Categories | Choose the categories this post belongs to. You can also type a new category, and it will be created in this blog when the post is saved. |
Categories can be renamed, reordered, or retired under Content Blogs Blog Categories.
Step 7: Save the Blog Entry
After the entry settings, blog content, images, status, active date, visibility, and categories have been completed, save the blog entry.
Once saved, the blog entry will be available as part of the selected blog based on the status and publishing settings.
Step 8: Review the Blog Entry
After saving, review the blog entry to confirm the headline, keyword rich URL, author, excerpt, content, images, status, visibility, and categories display correctly.
It is also helpful to review the blog index page so you can see how the excerpt and featured image appear when visitors browse the blog.
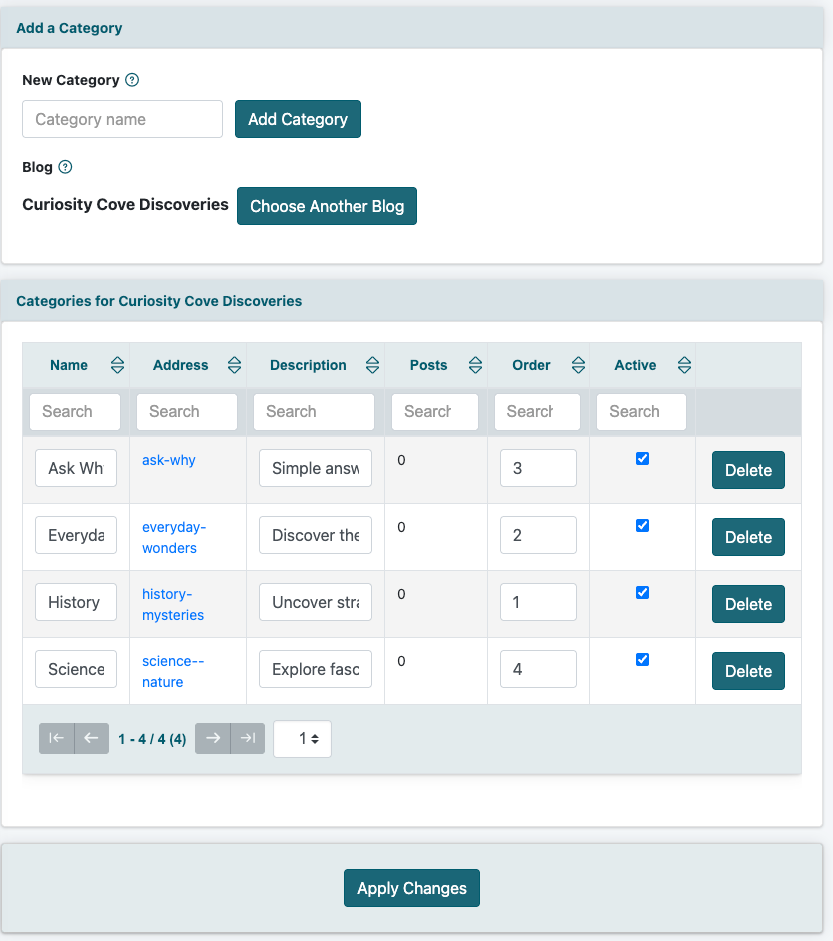
Blog categories organize entries by topic and make it easier for visitors to browse related posts. Categories can be added to each blog and then managed from the Blog Categories screen.
1. Add a Category
Enter a category name and click Add Category to create a new category for the selected blog.
2. Add Category Details
Add a short description and choose the order in which the category should appear.
3. Manage Categories
Update category names, change display order, control active status, or remove categories that are no longer needed.
Step 1: Open Blog Categories
Blog Categories can be found under Content Blogs Blog Categories.
The Blog Categories screen displays the categories associated with the currently selected blog.
Step 2: Select the Blog
The currently selected blog appears near the top of the screen.
If you want to manage categories for a different blog, click Choose Another Blog and select the blog you would like to work with.
Step 3: Add a New Category
Use the New Category section at the top of the page to create a category.
| Field | What to Enter |
|---|---|
| Category Name | Enter the name of the category. For example, a blog might use categories such as Everyday Wonders, Science & Nature, History Mysteries, or Ask Why. |
Click Add Category after entering the category name.
The new category will appear in the category table below, where additional information and settings can be added.
Step 4: Add and Manage Category Information
The category table contains the categories that have been created for the selected blog. Category information can be reviewed and updated directly from this table.
| Field | What It Controls |
|---|---|
| Name | Displays the category name. The name can be updated directly in the table if needed. |
| Address | Displays the web-friendly address created for the category. |
| Description | Enter a short description explaining the type of blog entries included in the category. |
| Posts | Displays the number of blog entries currently assigned to the category. |
| Order | Enter a number to control the order in which the categories are displayed. Lower numbers appear earlier in the category order. |
| Active | Check this option to keep the category active. Uncheck it if the category should remain available in the system but should no longer be active. |
| Delete | Click Delete to remove a category that is no longer needed. |
Step 5: Apply Your Changes
After updating category names, descriptions, display order, or active settings, click Apply Changes at the bottom of the page.
The categories are now ready to be assigned to blog entries and used to organize posts within the blog.
Blog comments can be reviewed before they are published. The Moderate Comments screen makes it easy to approve, reject, or delete comments submitted by readers.
Step 1: Review the Comment Notification
When a reader submits a new blog comment, an email notification is sent to the webmaster account.
The notification email includes a Review the Comment button that can be used to open the comment moderation screen directly.
You can also access comment moderation at any time by going to Content Blogs Moderate Comments.
Step 2: Choose the Comment Section
The Moderate Comments page separates comments into three sections:
| Section | What It Contains |
|---|---|
| Pending | Comments that have been submitted and are waiting to be reviewed. |
| Approved | Comments that have been approved for publication. |
| Rejected | Comments that have been reviewed and rejected. |
Click Pending, Approved, or Rejected to view the comments in that section.
Step 3: Moderate Pending Comments
Open the Pending section to review comments that are waiting for approval.
Each pending comment includes three moderation options:
| Button | What It Does |
|---|---|
| Approve | Approves the comment and moves it to the Approved section. The comment will then appear on the blog post. |
| Reject | Rejects the comment and moves it to the Rejected section. The comment will not appear on the blog post. |
| Delete | Deletes the comment completely. |
Step 4: Review Approved or Rejected Comments
Use the Approved and Rejected buttons to review comments that have already been moderated.
Approved comments are displayed with the blog post, while rejected comments remain unpublished.