Tutorial
How to Add a Tab Menu with the Tab Generator
A tab menu can easily be added to your pages on your MemberGate site without needing to use (or know!) jquery or other difficult web coding.
The instructions to add the tab menu to your page can be found below. Click each point to expand the section for more graphics and more specific steps.
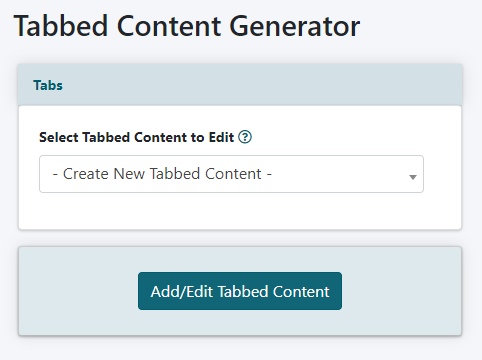
The Tab generator can be found under Tools Tabs
Choose 'Create New Tabbed Content' from the drop down menu and click the button.
Tab Content
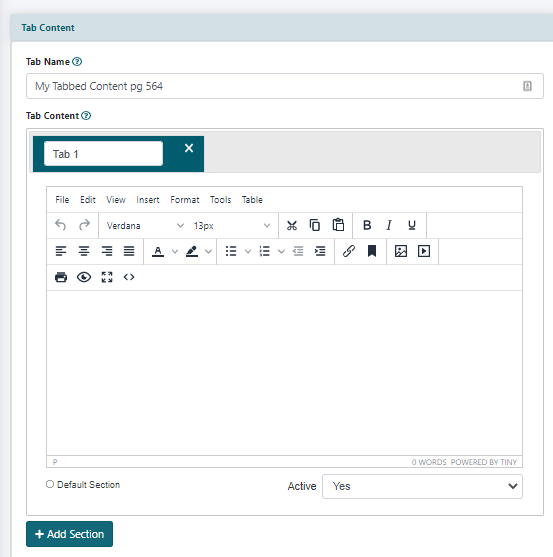
Tab Name
Enter a name for the tab. This name will not be shown anywhere on the live site. It is an identifier so you can find it in the drop down menu and edit it in the future.
Tab Content
Add the text of the tab section into a tab content box. The information can be like any content that is added to another page on your site - it can include any cf tags, images, media etc.
Add Section Headline
Enter a headline for each section in the field above the main text box for the tab content. This is the text the user will see to click on and open the box.
Default Section
Click the radio button if this section will be the default open area when the tab is loaded.
Status
Set the status of the section to 'active' if this section should be shown along with the tab. Set the status to 'inactive' if this section should not be shown along with the tab.
Add more Sections
Click the button to add another Header/Section area
Rearrange the Sections
If you have put your tab together and then decided that the order of the sections is incorrect, there is an easy way using a drag and drop method to rearrange the sections
Hover over the header area of the section that should be moved until the cursor turns to a hand
Click your mouse and the whole section is now movable
Move (drag) the section to the area of the tab where that section should be located.
Unclick the mouse to drop the section into it's new location.
Tab Settings
The settings and styling for the tab can be found in the tab settings section.
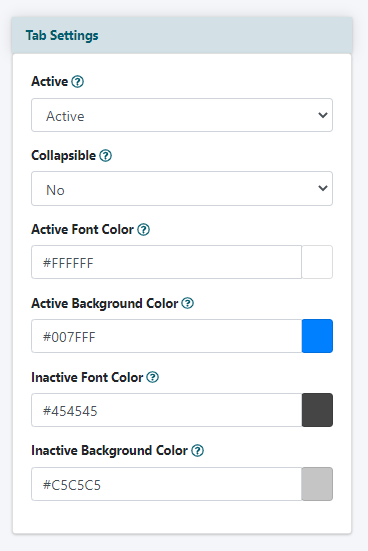
Active
Choose the status of the tab in this drop down menu. A status of 'active' means the tab will show on your site. A status of 'inactive' means the tab will not be displayed on any pages.
Collapsible
One section of the tab can appear opened by default or all of the sections can be hidden. Choose the desired option from the drop down menu. A choice of 'no' willl keep one section open. Select 'yes' if all of the sections should remain closed upon loading of the page.
Font and Background Colors
The fonts and background colors can be changed as needed. There can be a different font color for open (active) headers and a different color for open (active) background colors.
For the active font color, active background color, inactive font color and inactive background color click in each box and enter the hexadecimal color if known, or click in the color box to choose a color.
Press the button
Add the Tab to a Page
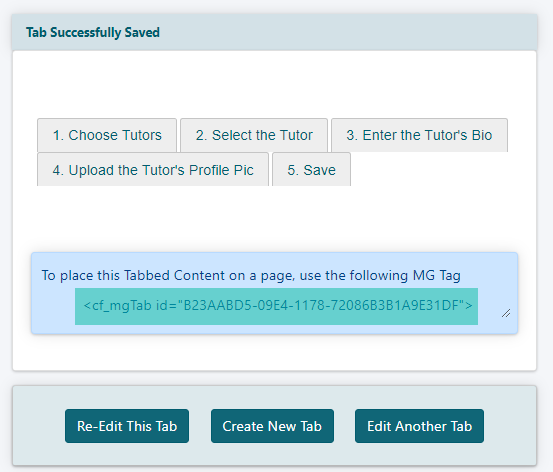
After the tab has been saved, a preview screen with the tab content will appear.
The CF Tag will appear in the box below the preview. Copy the cftag and paste it into the content box for a page, department or portal page.
The Tab Menu Will Appear on your Page