Tutorial
An audio playlist allows you to create one audio player that plays multiple audio clips. The user can pick and choose which audio clips to play, or it can be set up to auto-play which will automatically play each clip.
Audio playlists can be embedded on your content, department or portal pages. The audio playlist player has a responsive design option so it will adjust to the screen size on any desktop or mobile device. A user will be able to view the embedded audio clips directly from your pages.
There are two steps to creating an audio playlist:
- Create an audio player for each audio file
- Create the audio playlist
Once the audio playlist is created, new audio files can be added by creating the audio player first and then editing the audio playlist to include the new mp3.
Here is an example of an embedded audio playlist:
To Embed an Audio Playlist:
Click on each tab for instructions for part 1 and part 2
To Embed an Audio File:
Click each section to expand for more information:
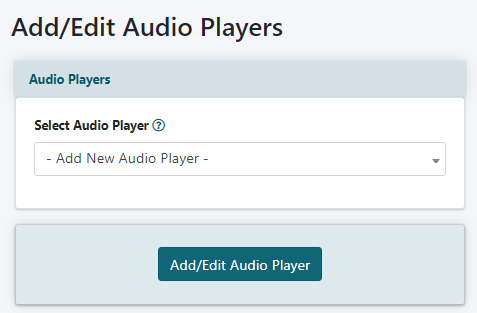
The Audio Players can be found under Multimedia Audio Players
Choose 'Add New Audio Player' from the drop down menu and click the button.
Audio Player
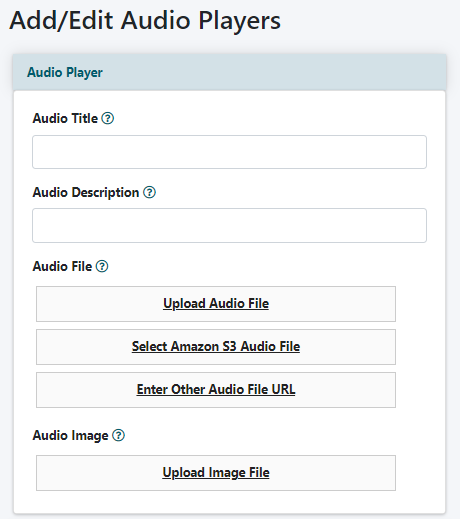
Audio Title
Enter a Title for the audio
Audio Description
Enter a Brief Description for the audio
Audio File
There are three different ways to select the audio file that can be played in this player.
Upload Audio Option
If uploading the file directly to the site, click Upload Audio File and select the file from your local drive.
Select Amazon S3 Audio File
To select the file from your Amazon S3 Account choose the Select Amazon S3 Audio File link. Visit the tutorial on using Amazon S3 to upload your files for more instruction if necessary.
Enter Other Audio File URL
To use an audio file hosted at another third party solution, click Enter Other Audio URL and enter the full URL of the audio in the box. Visit the tutorial on using files hosted from a third party for more instruction if necessary.
Audio Image
Click on Upload Image File and select an image from your local drive. This image will appear as the static image for the audio player.
For best results, the image dimensions should equal the player dimensions.
Settings
Click on the Settings box to open the section.
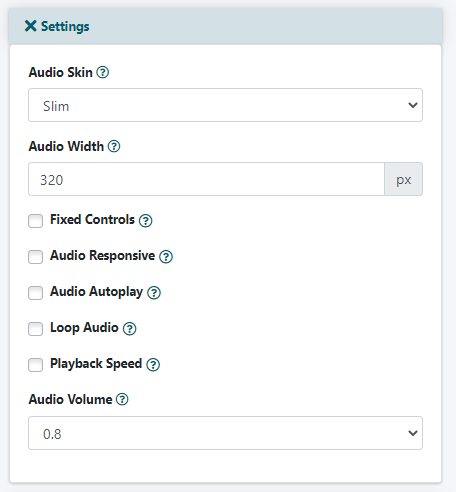
Audio Skin
Set the type of Audio Skin for the Player from the drop down menu. The drop down options are slim, fat, full or button.
Audio Width
Add an Audio Width for the audio player. This will be the maximum width for the player. It will automatically adjust on smaller screen sizes.
Fixed Controls
Check the box for 'Fixed Controls' to always display the player's controls. If the 'Fixed Controls' is left unchecked, the bottom controls will only show when the user hovers over the audio player.
*If there is not an image uploaded, the controls will always show.
Audio Responsive
Check the box for 'responsive' if you would like the player to always fill the width of the user's full screen. Uncheck this box if the player will have a max width set in the Audio Width field.
Audio Autoplay
Check the box to set the audio so that it automatically begins playing upon loading. Leave the box unchecked when you would like the user to manually click the play button to begin watching.
Loop Audio
At the end of the audio it will automatically begin playing from the start. If this is the desired behavior, check the 'Loop Audio' box.
Playback Speed
Check this box to provide a control for the user to control the speed of the audio.
Audio Volume
Choose the initial volume setting for the audio from the drop down box. The user can manually adjust the volume in the controls if necessary.
Styling
Click on the Styling box to open the section.
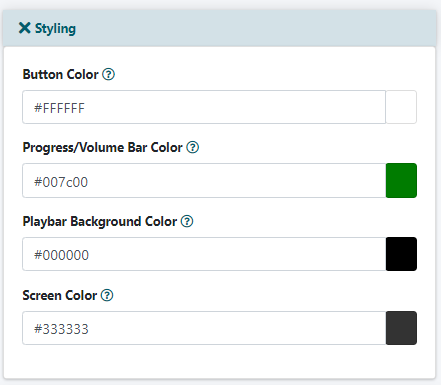
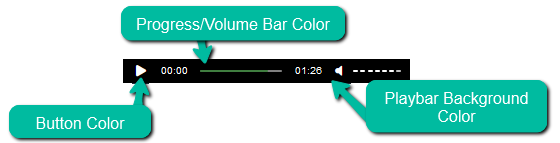
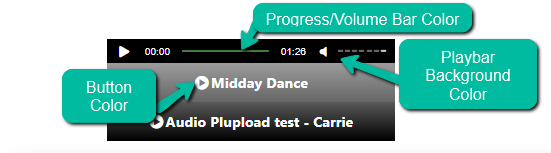
Button Color
Set the Color for the buttons on the control bar. Click in the box and enter the hexadecimal color if known, or click in the color box to choose a color.
Progress/Volume Bar Color
Set the color for the volume and progress bars on the player. Click in the box and enter the hexadecimal color if known, or click in the color box to choose a color.
Playbar Background Color
Set the color for the color behind the volume and progress bars. Click in the first box and enter the hexadecimal color if known, or click in the color box to choose a color.
Screen Color
Set the color for the background of the audio. Click in the box and enter the hexadecimal color if known, or click in the color box to choose a color.
Action Events
A script can be input to run after a specific set time.
Click on the Actions box to open the section.
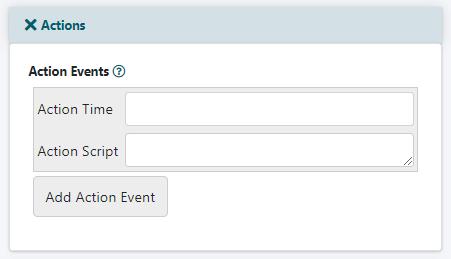
Action Time
Enter the amount of time in seconds. This is the time after the audio has been started when the script will run.
Actions Script
Add the script into the actions script box.
Add Additional Scripts
Click on the button and repeat the two steps above.
Click the button.
Add the Audio Player to a Page
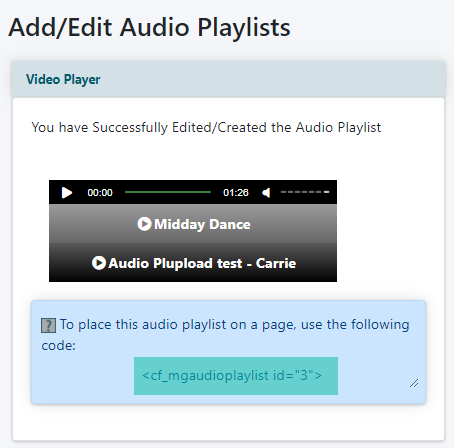
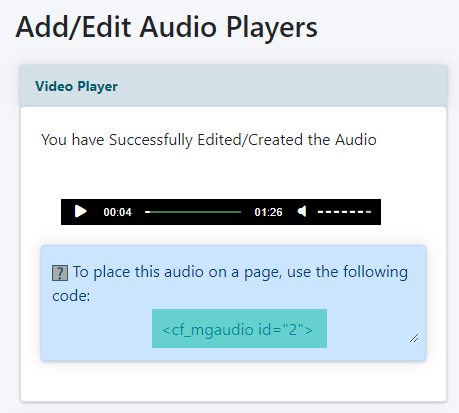
After the audio has been saved, a preview screen with the audio will appear.
The CF Tag will appear in the box below the audio. Copy the cftag and paste it into the content box for a page, department or portal page.
To Embed an Audio Playlist:
Click on each section to expand for more information.
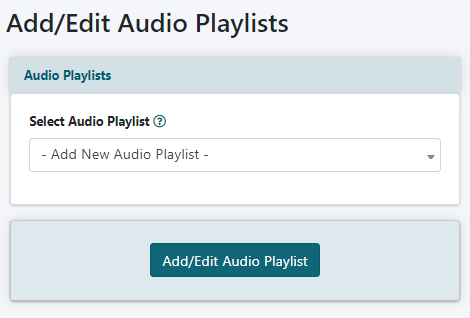
The Audio Playlists can be found under Multimedia Audio Playlists
Choose 'Add New Video Player' from the drop down menu and click the button.
Audio Playlist
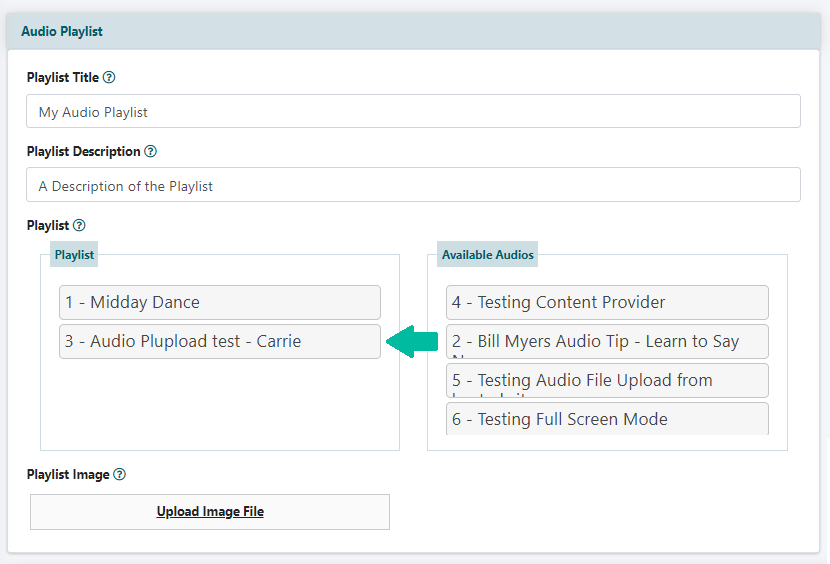
Playlist Title
Enter a Title for the playlist
Playlist Description
Enter a Brief Description for the playlist
Playlist
Add Audios to the Playlist
Existing audio player files are listed in the 'Available Audios' box. Click on the name of the audio to add to the playlist and drag and drop it into the 'Playlist' box.
Organize Audios in the Playlist
Audio files in the playlist can be arranged by clicking on the name in the 'Playlist' and dragging and dropping it where it should appear in the Playlist box.
Removing Audio Files from the Playlist
Current audio files can be removed from the playlist. Click on the name of the audio to remove from the playlist and drag and drop it into the 'Available Audios' box.
Playlist Image
Click on Upload Image File and select an image from your local drive. This image will appear as the static image for the audio playlist before it begins playing.
For best results, the image dimensions should equal the player dimensions.
Settings
Click on the Settings box to open the section.
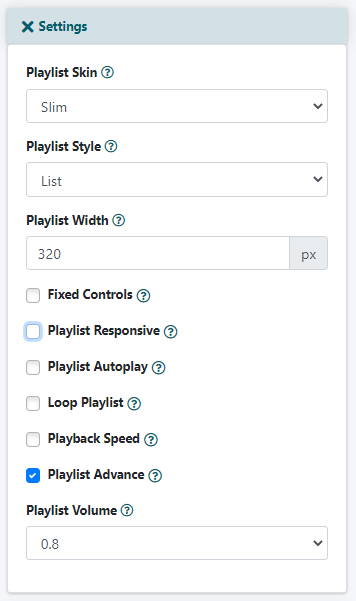
Playlist Skin
Set the type of Audio Skin for the player from the drop down menu. The drop down options are slim, fat or full.
Playlist Style
Choose how the playlist will be displayed in the player from the drop down menu. Choose 'List' to only include the title of the audio, choose 'Detailed' to show the title and description.
Playlist Width
Add a Playlist Width for the audio player. This will be the maximum width for the screensize. It will automatically adjust on smaller screen sizes.
Fixed Controls
Check the box for 'Fixed Controls' to always display the player's controls. If the 'Fixed Controls' is left unchecked, the bottom controls will only show when the user hovers over the audio player.
Playlist Responsive
Check the box for 'responsive' if you would like the player to always fill the width of the user's full screen.
Playlist Autoplay
Check the box to set the audio so that it automatically begins playing upon loading. Leave the box unchecked when you would like the user to manually click the play button to begin watching.
Loop Playlist
At the end of the last audio file, it will automatically begin playing from the start. If this is the desired behavior, check the 'Loop Playlist' box.
Playback Speed
Check this box to provide a control for the user to control the speed of the audio.
Playlist Advance
Check this box to automatically begin playing the next audio in the playlist when the previous one ends.
Playlist Volume
Choose the initial volume setting for the audio from the drop down box. The user can manually adjust the volume in the controls if necessary.
Styling
Click on the Styling box to open the section.
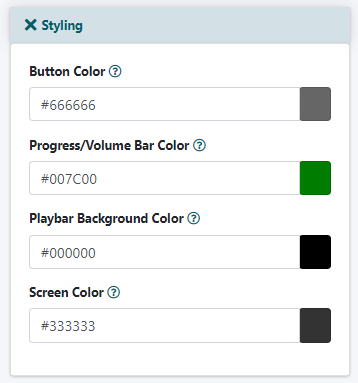
Button Color
Set the Color for the buttons on the control bar. Click in the box and enter the hexadecimal color if known, or click in the color box to choose a color.
Progress/Volume Bar Color
Set the color for the volume and progress bars on the player. Click in the box and enter the hexadecimal color if known, or click in the color box to choose a color.
Playbar Background Color
Set the color for the color behind the volume and progress bars. Click in the first box and enter the hexadecimal color if known, or click in the color box to choose a color.
Screen Color
Set the color for the background of the audio. Click in the box and enter the hexadecimal color if known, or click in the color box to choose a color.
Click the button.
Add the Audio Playlist to a Page
After the audio playlist has been saved, a preview screen with the audio will appear.
The CF Tag will appear in the box below the audio playlist. Copy the cftag and paste it into the content box for a page, department or portal page.