Tutorial
A Business Plan is a Multi-Member plan, where there is only one fee paid by the Primary Account Owner. The primary user can then invite a set number of secondary users to join as Sub-Users
Follow the steps found in this tutorial to create a Business Member Plan for your MemberGate site
Note: There are many fields that are the same as when a regular plan is set up. Those fields will not be addressed in this tutorial unless necessary. If more information is needed for any fields not mentioned here, please review the tutorial for setting up an individual member plan.
A Business Plan Membership can be set up in 2 steps:
- Setting Up the Business Plan Specs
- Connect the Business Plan to a Subscription Form
There are other parts and resources to understand how the business plan will work from a member standpoint.
Find out those details in parts: - How the Member will Use the Business Plan
- Resources - Links for Users
Click on each of the tabs below for the instructions:
- 1A. Set Up Recurring Business Plan
- 1B. Set Up Non-Recurring Business Plan
- 2. Create the Subscription Form
- 3. How to Use the Business Plan
- 4. Links for Users
Setting Up the Business Plan Specs for a Recurring Membership
Use the instructions below to create a member plan for business or multi-member subscriptions for a one time payment that allows access for a set time period.
Check out how Business Plans could benefit your website.
Click on each section for more information
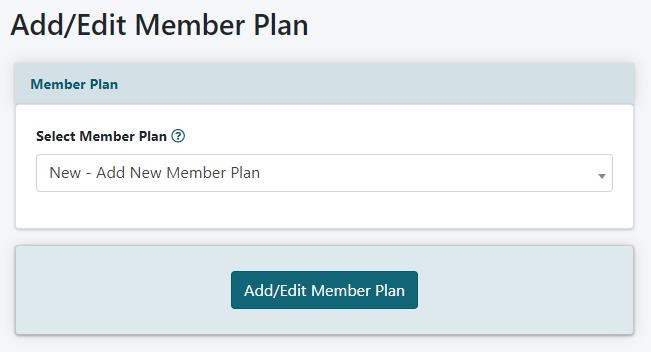
The Edit Member Plans page can be found under Members Edit Member Plans
From the drop down menu choose 'New - Add New Member Plan' and press the button
Set the Plan Name and a Business Recurring Membership
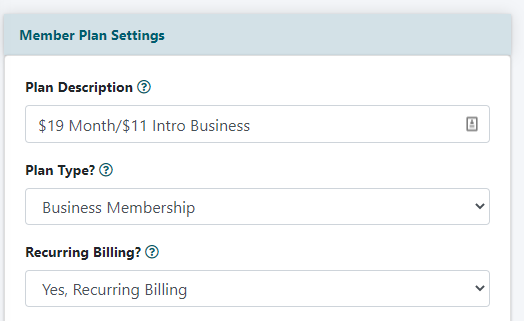
Let's set up an example business member plan that has a $19.00 fee per month automatically charged with a $11.00 trial fee for the first month.
Plan Description
It's probably best to name this something descriptive so that you can easily find and understand it's rates at a later date. For example - $19 Month/$11 Intro. This text is just for reference, so name it something that makes sense to you.
Plan Type
Choose 'Business' from the drop down menu. Business is a membership type for a group of sub-users under one parent membership account.
Recurring Billing
Selec 'Yes, Recurring Billing' from the drop down menu. Recurring Billing means the software will automtically process billing and payments for your parent account in customizable time periods.
Set the Amount to be Charged and How Long the Subscription Lasts
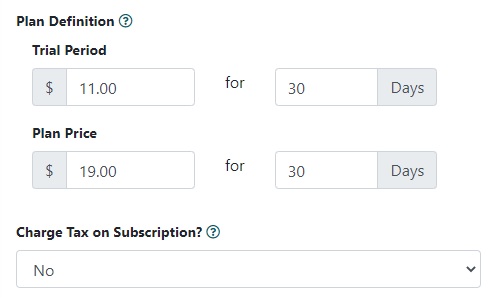
The next section under Plan Definition is where to set the amount charged and how long the subscription lasts. If the plan is a recurring plan, the amount of days set is when the next fee will be incurred.
What is a Trial Period?
This is the amount of days set for the trial period. After this set number of days, the regular plan fee will be incurred. As in our example above, the trial period is one month, so the amount of days is set as 30.
Trial Period
This is an optional field and is only necessary if there will be a trial period or introductory price. Enter in the amount that should be charged on day one of the trial or introductory period. If the pricing acts like a registration fee ($49 one time fee plus $5 month, include that monthly fee in the Trial Price as well. In this case the Trial Price would be set as $54). This amount can be entered without a currency symbol, and should be in decimal form. A free trial period is set at 0.00.
Then set the number of days the until the next billing should take place.
Plan Price
Enter the amount the plan will cost per subscription period for the parent in the business plan For a recurring plan, this will be the fee incurred each recurring period. This amount can be entered without a currency symbol, and should be in decimal form.
Then enter the amount of days for the billing period. If this is a recurring plan, this will be the amount of days for each recurring period. If it is a monthly plan, this number should be set to 30 or 31, or a yearly plan can be set at 365. At the end of the period, the business parent member will automatically be charged the plan price.
Charge Tax on Subscriptions
Set the drop down box to 'No' to not charge taxes on subscription fees. Set it to 'yes' to charge taxes on subscription fees collected. Follow the steps in this tutorial to set up the subscription tax information. There are many rules on taxes. Please contact your accountant for more information.
These next fields are all OPTIONAL
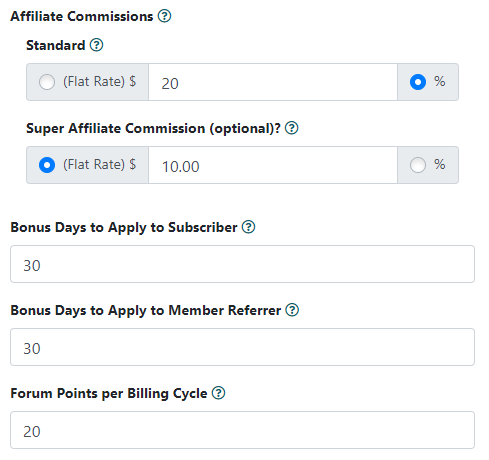
Affiliate Commissions
Standard
If there are affiliates of your site, the commission that they earn for each billing can be set in this field. Click the % radio box to set a percentage of the plan price an affiliate can earn on each billing cycle. Alternatively, an affiiate can earn a flat rate if they are just to earn a specific dollar amount (click the (Flat Rate) box). It is not necessary to add a currency symbol or percentage sign in this field.
Super Affiliate Commission (optional)
If there are super affiliates of your site, the commission that they earn for each billing can be set in this field. Click the % radio box to set a percentage of the plan price an affiliate can earn on each billing cycle. Alternatively, an affiiate can earn a flat rate if they are just to earn a specific dollar amount (click the (Flat Rate) box). It is not necessary to add a currency symbol or percentage sign in this field.
Bonus Days to Apply to Subscriber
If existing members refer a new member, bonus days beyond those set in the plan can automatically be given to the new member. Visit this Bonus Days tutorial for more information about the referral option.
Bonus Days to Apply to Member Referrer
If existing members refer a new member, bonus days can be added to the cycle of the existing members before they are charged their next recurring fee. Visit this Bonus Days tutorial for more information about the referral option.
Forum Points per Billing Cycle
If using the point system, enter a number of points that can be added to the members total points each time a new recurring fee is incurred.
Set New and Existing Member Access and a Member Alert Number
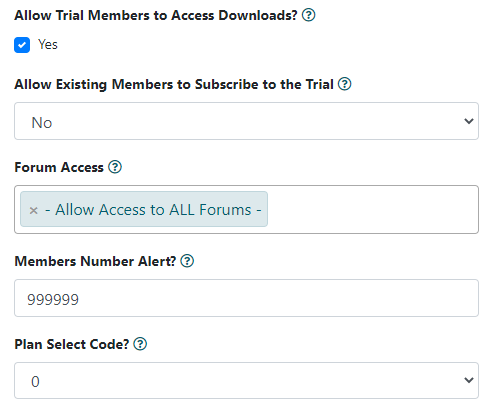
Allow trial members to access downloads?
You may not want members who are currently in their trial period to access your download files. Check the box if you would like to give them access. Uncheck the box to disallow your trial members access to the downloads available through the Download Library.
Allow Existing Members to Subscribe to the Trial
An existing member is anyone who has an existing email address and username in the database. Select 'yes' to allow a member to be able to subscribe to the trial. Select 'no' if you do not want them to subscribe to the trial. When set to 'no' an existing member who subscribes to this plan will be charged the 'plan price' right away. Setting this to 'no' might be appropropriate for a plan that might be a free trial for x number of days for example.
Setting this drop down to 'Yes, if Renewing from a Different Plan' will allow everyone to incur the trial price during their very first purchase. If however, a member on this plan renews (for example, if they have a billing failure) they would only be charged the plan price.
Forum Access
Set which forums members of this plan can access. Click in the box and select the member plans that are allowed access to the forums.
Members Number Alert
Enter a number in this box if you would like to be alerted from the system when that number of members is reached for this member plan. This can be helpful with plans that have a maximum number of members (for example, a special Coaching Plan with a max member group of 10 members).
Plan Select Code
This is an optional field, and can be used for reporting purposes if you would like to group specific member plans together in reports. This is an optional field, and can be used for reporting purposes if you would like to group specific member plans together in reports.
Set the Pages the New Member Will be Directed to
Members can be redirected to specialized pages based on member plan. These settings can be found under the Plan Pages section.
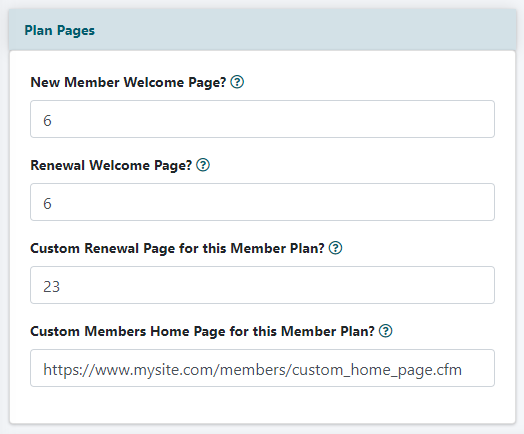
New Member Welcome Page
After submitting the subscription form, the new member is automatically redirected to this welcome page on your site. Set this field with the content page number that you would like the new member to see. The content page should be a public page and can be added to the 'work pages' department.
Renewal Welcome Page
After submitting the subscription form, the existing member is automatically redirected to this welcome page on your site. Set this field with the content page number that you would like the existing member to see after renewing. The content page should be a public page and can be added to the 'work pages' department.
Custom Renewal Page for this Member Plan
When an expired member tries to login to the site, set the software to automatically redirect the user to a subscription form. Enter the content page number for the subscription form (or any content page - could be a sales page). This page should be a public page and can be added to the 'work pages' department. If this custom renewal field is set as page 23, the expired user will automatically be redirected to a prefilled subscription form. They just have to enter their credit card details, and they will be renewed into the same plan that they are currently a member.
Custom Members Home Page for this Member Plan
Enter the URL if you would like members of this plan to have a members home page that is DIFFERENT than the members portal page.
Customize the Business Plan Settings
Because this is a business plan which includes sub-users under a primary user account, the settings for the sub-user can be updated in the 'Business Plans Settings' section.
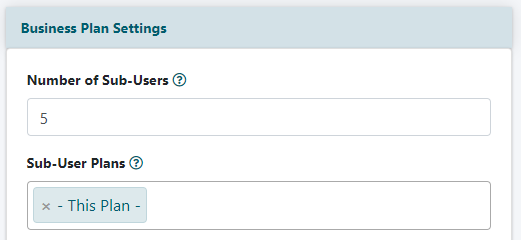
Number of Sub Users
The primary user can invite a specific number of sub-users to join as members of your site. Enter the number of sub-users the primary user can invite. The sub-users are not charged an individual member fee, as the umbrella fee is paid for by the primary user account.
Sub User Plans
Select other plans that the primary user can assign to the sub-users. By default, all sub-users will be assigned to the same plan as the primary user, but if you would like the primary user to add their sub-users to other plans, those plans can be selected in this field. This might work well if you have different coaching plans to which the sub-users may be a better fit.
Customize the Invite Message Sent to Subusers
There are just a few more sub-user settings that can be updated in the 'Business Plans Settings' section.
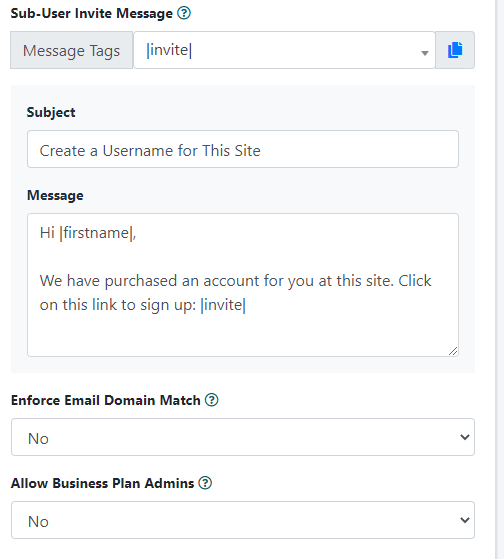
Sub User Invite Message
When a sub-user is invited to join your site as a member, the primary user will send them an invitation via email. Include a custom message for the sub-user in this field. The Subject is the subject or topic of the email and the main body of the email can be added to the Message field.
Use the Message Tags field to easily copy/paste the variables in the invite email message. See the section below on Message Tags for further instruction.
Enforce Email Domain Match
If the sub-user has to have an email address with the same domain as the primary user, select 'yes' from the drop down menu. If the email address of the sub-user does not have to match the domain as the primary user, select 'no' from the drop down menu.
Allow Business Plan Admins
The primary user does not have to manage the sub-users themselves. If you would like to provide the primary user the option to assign another sub-user as an administrator on the account select 'yes' from the drop down menu. If you do not want any sub-users to be an admin, and only the primary user can manage the sub-users select 'no' from the drop down menu.
An admin can adminster the primary account, invite new sub-users or edit existing sub-users.
Customize Your Email Messages
Automatic email messages will be sent to your members when certain conditions are met. These email messages can be customized for each member plan. Instructions for using the message tags in these email messages can be found in the next section of this tutorial
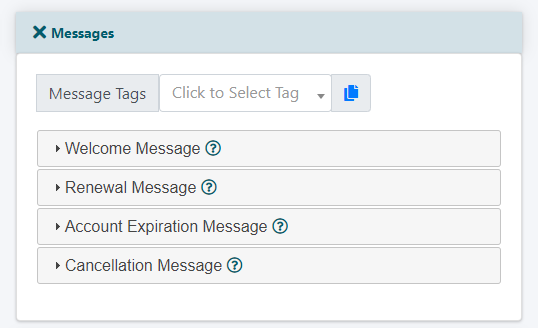
Click on each of the sections to open up the edit boxes for the email message.
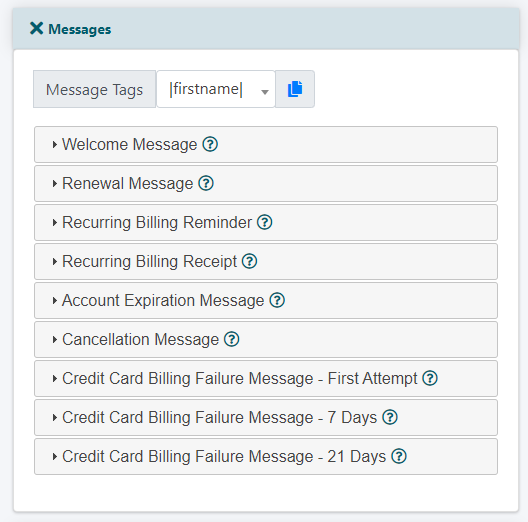
Welcome Message
This is the email a NEW member will receive upon submitting the subscription form. Placeholders for specific variables can be included in the message by using the variables found in the message tags with the pipe symbols surrounding them - like |firstname| to substitute for the member's first name.
Renewal Message
This is the email an EXISTING member will receive upon a submitting the subscription form. Placeholders for specific variables can be included in the message by using the variables found in the message tags with the pipe symbols surrounding them - like |firstname| to substitute for the member's first name.
Recurring Billing Reminder
This is an OPTIONAL field. It is the email message that is sent to a member prior to each time their recurring billing fee is collected. Placeholders for specific variables can be included in the message by using the variables found in the message tags with the pipe symbols surrounding them - like |firstname| to substitute for the member's first name.
Days Before Billing
Enter the number of days prior to the billing that the Recurring Billing Reminder should be delivered.
Only Send at Trial End
Check the box to only send the Recurring Billing Reminder one time - prior to the first regular price plan billing.
Recurring Billing Receipt
This is an OPTIONAL field. It is the email message that is sent to a member each time their recurring billing fee is collected.
Account Expiration Message
When the expiration date of the member's credit card is about to expire, they are sent an email with information that their membership could have a billing failure and they would lose access to the site. This message could include a link to the credit card update page in the 'Your Account' department. Placeholders for specific variables can be included in the message by using the variables found in the message tags with the pipe symbols surrounding them - like |firstname| to substitute for the member's first name.
Days before Account expiration notices are sent
Enter the number of days prior to the expiration date that the Account Expiration Message should be delivered.
Cancellation Message
Optional - When a member cancels their memberships, a generic email is delivered to them with information about the cancellation. If you would like to send members of this plan a custom message, the message can be included in this field. Placeholders for specific variables can be included in the message by using the variables found in the message tags with the pipe symbols surrounding them - like |firstname| to substitute for the member's first name.
Credit Card Billing Failure Message (and 7 and 21 day failures)
Optional - When a recurring member has a billing failure, they will receive a generic message with details. Alternatively if there is a custom message in 'edit site descriptions', they will receive that message. If you would like members of this plan to have a different custom message, enter it in these fields.
How to Use the Message Tags Option
Placeholders for specific variables can be included in the email messages by using the variables found in the message tags with the pipe symbols surrounding them - like |firstname| to substitute for the member's first name.
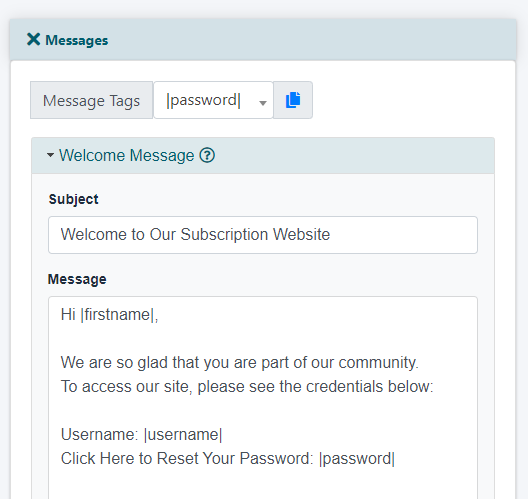
To Use
1. Select the placeholder variable from the drop down menu
2. Click on the copy icon
3. Click in the body of the email message where you would like the variable to appear and use the PASTE function from your computer
Set Up Your Autoresponder
Automatic management of email marketing lists can be controlled at the member plan level. Members can automatically be added or removed from your lists. The setup is completed under under the 'List Server Codes' section.
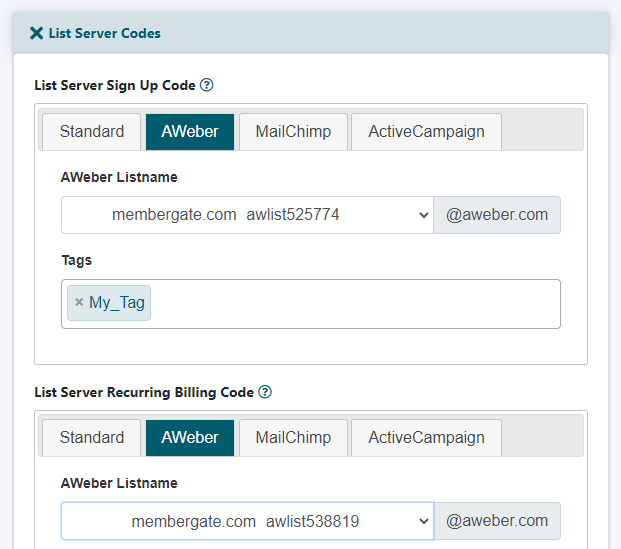

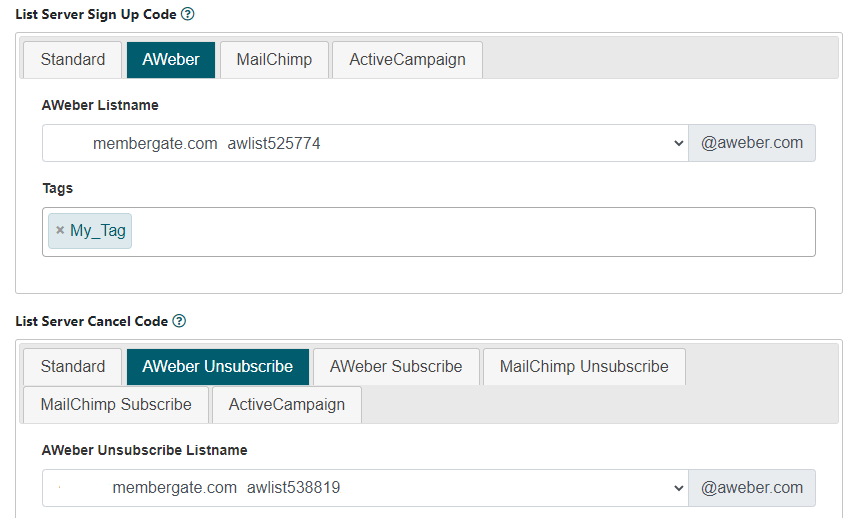
List Server Sign Up Code
When a new member subscribes, their name and email address can automatically be sent to your email marketing list.
AWeber Users:
If you are using AWeber select the AWeber tab and select the list from the drop down menu, and set any available tags. This is assuming that you have connected to the AWeber API. If you have not, please follow the instructions found here: Connect to AWeber API
Infusionsoft Users
If you have connected to Infusionsoft, click that tab and choose your tags and action sets from those boxes. If you have not connected to Infusionsoft yet, please see this tutorial: Connect to Infusionsoft
MailChimp Users
If you are using MailChimp, select the MailChimp tab and select the list from the drop down menu. This is assuming that you have connected to MailChimp API. If you have not, please follow the instructions found here: Connect to MailChimp API
Active Campaign Users
If you are using Active Campaign, select the Active Campaign tab and select the list from the drop down menu. This is assuming that you have connected to Active Campaign API.
Other Autorresponder Users
If you are using another email marketing list provider and you have the email parser code, the raw code can be pasted into the standard box.
List Server Recurring Billing Code
It is also possible to change the list that a member is on when the recurring billing process is run. If you would like to update the member's list, follow the same instructions in the List Server Sign Up Code section.
List Server Cancel Code
When a member cancels, they can automatically be removed from the marketing list or moved to a different list. Choose 'Unsubscribe' to remove them from their existing list. Choose 'subscribe' to remove them from their existing list and add them to a new list. Choose the new list from the drop down menu.
Run List Server Cancel Code when?
Choose at which point you would like the member to change according to the List Server Cancel Code. Should the cancel code run when the member goes 'inactive', 'cancels' or is 'deleted' from the system.
Press the button
Once that has been completed, the subscription form can be created using the Subscription Form Generator
Setting Up the Business Plan Specs for a Non-Recurring Membership
Use the instructions below to create a member plan for business or multi-member subscriptions for a one time payment that allows access for a set time period.
Check out how Business Plans could benefit your website.
Click on each section for more information
From the drop down menu choose 'New - Add New Member Plan' and press the button
Set the Plan Name and a Business Non-Recurring Membership
Let's set up an example business member plan that has a $279.00 fee per year. A member will have access for the full year, and then will have to manually renew their membership to continue their subscription benefits.
These first settings can be found under the 'Member Plan Settings' section.
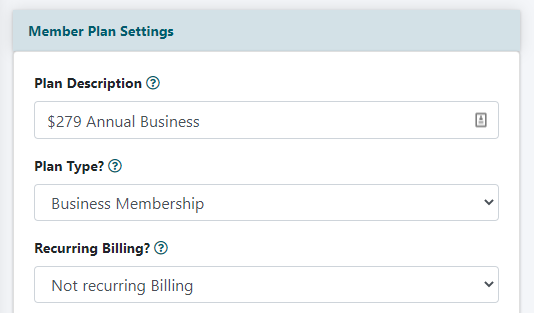
Plan Description
It's probably best to name this something descriptive so that you can easily find and understand it's rates at a later date. For example - $279 Annual Business. This text is just for reference, so name it something that makes sense to you.
Plan Type
Choose 'Business' from the drop down menu. Business is a membership type for a group of sub-users under one parent membership account.
Recurring Billing
Select 'Not Recurring Billing' from the drop down menu. Not-recurring billing means the member will only pay a one time fee for the X amount of days (set in 'Plan Length in Days'). They will have to manually renew their account upon expiration.
Set the Amount to be Charged and How Long the Subscription Lasts
The next section under Plan Definition is where to set the amount charged and how long the subscription lasts. Since the plan is a not recurring plan, the amount of days set is how long the subscription will last.
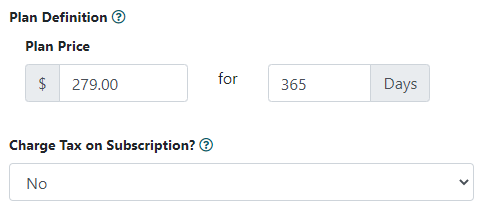
Plan Price
Enter the amount the plan will cost per subscription period. Since this is a non-recurring plan, this will be the fee the member will pay for the entire subscription period. This amount can be entered without a currency symbol, and should be in decimal form.
Enter the amount of days for the billing period. Since this is a non-recurring plan, this is the amount of days of the whole subscription. For example, a yearly non-recurring plan would be set for 365.
Charge Tax on Subscriptions
Set the drop down box to 'No' to not charge taxes on subscription fees. Set it to 'yes' to charge taxes on subscription fees collected. Follow the steps in this tutorial to set up the subscription tax information. There are many rules on taxes. Please contact your accountant for more information.
These next fields are all OPTIONAL
Affiliate Commissions
Standard
If there are affiliates of your site, the commission that they earn for each billing can be set in this field. Click the % radio box to set a percentage of the plan price an affiliate can earn on each billing cycle. Alternatively, an affiiate can earn a flat rate if they are just to earn a specific dollar amount (click the (Flat Rate) box). It is not necessary to add a currency symbol or percentage sign in this field.
Super Affiliate Commission (optional)
If there are super affiliates of your site, the commission that they earn for each billing can be set in this field. Click the % radio box to set a percentage of the plan price an affiliate can earn on each billing cycle. Alternatively, an affiiate can earn a flat rate if they are just to earn a specific dollar amount (click the (Flat Rate) box). It is not necessary to add a currency symbol or percentage sign in this field.
Bonus Days to Apply to Subscriber
If existing members refer a new member, bonus days beyond those set in the plan can automatically be given to the new member. Visit this Bonus Days tutorial for more information about the referral option.
Bonus Days to Apply to Member Referrer
If existing members refer a new member, bonus days can be added to the cycle of the existing members before they are charged their next recurring fee. Visit this Bonus Days tutorial for more information about the referral option.
Forum Points per Billing Cycle
If using the point system, enter a number of points that can be added to the members total points each time a new recurring fee is incurred.
Set New and Existing Member Access and a Member Alert Number
Allow trial members to access downloads?
You may not want members who are currently in their trial period to access your download files. Check the box if you would like to give them access. Uncheck the box to disallow your trial members access to the downloads available through the Download Library.
Allow Existing Members to Subscribe to the Trial
An existing member is anyone who has an existing email address and username in the database. Select 'yes' to allow a member to be able to subscribe to the trial. Select 'no' if you do not want them to subscribe to the trial. When set to 'no' an existing member who subscribes to this plan will be charged the 'plan price' right away. Setting this to 'no' might be appropropriate for a plan that might be a free trial for x number of days for example.
Setting this drop down to 'Yes, if Renewing from a Different Plan' will allow everyone to incur the trial price during their very first purchase. If however, a member on this plan renews (for example, if they have a billing failure) they would only be charged the plan price.
Forum Access
Set which forums members of this plan can access. Click in the box and select the member plans that are allowed access to the forums.
Members Number Alert
Enter a number in this box if you would like to be alerted from the system when that number of members is reached for this member plan. This can be helpful with plans that have a maximum number of members (for example, a special Coaching Plan with a max member group of 10 members).
Plan Select Code
This is an optional field, and can be used for reporting purposes if you would like to group specific member plans together in reports. This is an optional field, and can be used for reporting purposes if you would like to group specific member plans together in reports.
Set the Pages the New Member Will be Directed to
Members can be redirected to specialized pages based on member plan. These settings can be found under the Plan Pages section.
New Member Welcome Page
After submitting the subscription form, the new member is automatically redirected to this welcome page on your site. Set this field with the content page number that you would like the new member to see. The content page should be a public page and can be added to the 'work pages' department.
Renewal Welcome Page
After submitting the subscription form, the existing member is automatically redirected to this welcome page on your site. Set this field with the content page number that you would like the existing member to see after renewing. The content page should be a public page and can be added to the 'work pages' department.
Custom Renewal Page for this Member Plan
When an expired member tries to login to the site, set the software to automatically redirect the user to a subscription form. Enter the content page number for the subscription form (or any content page - could be a sales page). This page should be a public page and can be added to the 'work pages' department. If this custom renewal field is set as page 23, the expired user will automatically be redirected to a prefilled subscription form. They just have to enter their credit card details, and they will be renewed into the same plan that they are currently a member.
Custom Members Home Page for this Member Plan
Enter the URL if you would like members of this plan to have a members home page that is DIFFERENT than the members portal page.
Customize the Business Plan Settings
Because this is a business plan which includes sub-users under a primary user account, the settings for the sub-user can be updated in the 'Business Plans Settings' section.
Number of Sub Users
The primary user can invite a specific number of sub-users to join as members of your site. Enter the number of sub-users the primary user can invite. The sub-users are not charged an individual member fee, as the umbrella fee is paid for by the primary user account.
Sub User Plans
Select other plans that the primary user can assign to the sub-users. By default, all sub-users will be assigned to the same plan as the primary user, but if you would like the primary user to add their sub-users to other plans, those plans can be selected in this field. This might work well if you have different coaching plans to which the sub-users may be a better fit.
Customize the Invite Message Sent to Subusers
There are just a few more sub-user settings that can be updated in the 'Business Plans Settings' section.
Sub User Invite Message
When a sub-user is invited to join your site as a member, the primary user will send them an invitation via email. Include a custom message for the sub-user in this field. The Subject is the subject or topic of the email and the main body of the email can be added to the Message field.
Use the Message Tags field to easily copy/paste the variables in the invite email message. See the section below on Message Tags for further instruction.
Enforce Email Domain Match
If the sub-user has to have an email address with the same domain as the primary user, select 'yes' from the drop down menu. If the email address of the sub-user does not have to match the domain as the primary user, select 'no' from the drop down menu.
Allow Business Plan Admins
The primary user does not have to manage the sub-users themselves. If you would like to provide the primary user the option to assign another sub-user as an administrator on the account select 'yes' from the drop down menu. If you do not want any sub-users to be an admin, and only the primary user can manage the sub-users select 'no' from the drop down menu.
An admin can adminster the primary account, invite new sub-users or edit existing sub-users.
Customize Your Email Messages
Automatic email messages will be sent to your members when certain conditions are met. These email messages can be customized for each member plan. Instructions for using the message tags in these email messages can be found in the next section of this tutorial
Click on each of the sections to open up the edit boxes for the email message.
Welcome Message
This is the email a NEW member will receive upon submitting the subscription form. Placeholders for specific variables can be included in the message by using the variables found in the message tags with the pipe symbols surrounding them - like |firstname| to substitute for the member's first name.
Renewal Message
This is the email an EXISTING member will receive upon a submitting the subscription form. Placeholders for specific variables can be included in the message by using the variables found in the message tags with the pipe symbols surrounding them - like |firstname| to substitute for the member's first name.
Account Expiration Message
When the expiration date of the membership is close, they are sent an email that the account will expire soon. This message could include a link to the renewal page so they can resubscribe. Placeholders for specific variables can be included in the message by using the variables found in the message tags with the pipe symbols surrounding them - like |firstname| to substitute for the member's first name.
Days before Account expiration notices are sent
Enter the number of days prior to the expiration date that the Account Expiration Message should be delivered.
Cancellation Message
Optional - When a member cancels their memberships, a generic email is delivered to them with information about the cancellation. If you would like to send members of this plan a custom message, the message can be included in this field. Placeholders for specific variables can be included in the message by using the variables found in the message tags with the pipe symbols surrounding them - like |firstname| to substitute for the member's first name.
How to Use the Message Tags Option
Placeholders for specific variables can be included in the email messages by using the variables found in the message tags with the pipe symbols surrounding them - like |firstname| to substitute for the member's first name.
To Use
1. Select the placeholder variable from the drop down menu
2. Click on the copy icon
3. Click in the body of the email message where you would like the variable to appear and use the PASTE function from your computer
Set Up Your Autoresponder
Automatic management of email marketing lists can be controlled at the member plan level. Members can automatically be added or removed from your lists. The setup is completed under under the 'List Server Codes' section.

List Server Sign Up Code
When a new member subscribes, their name and email address can automatically be sent to your email marketing list.
AWeber Users:
If you are using AWeber select the AWeber tab and select the list from the drop down menu, and set any available tags. This is assuming that you have connected to the AWeber API. If you have not, please follow the instructions found here: Connect to AWeber API
Infusionsoft Users
If you have connected to Infusionsoft, click that tab and choose your tags and action sets from those boxes. If you have not connected to Infusionsoft yet, please see this tutorial: Connect to Infusionsoft
MailChimp Users
If you are using MailChimp, select the MailChimp tab and select the list from the drop down menu. This is assuming that you have connected to MailChimp API. If you have not, please follow the instructions found here: Connect to MailChimp API
Active Campaign Users
If you are using Active Campaign, select the Active Campaign tab and select the list from the drop down menu. This is assuming that you have connected to Active Campaign API.
Other Autoresponder Users
If you are using another email marketing list provider and you have the email parser code, the raw code can be pasted into the standard box.
List Server Cancel Code
When a member cancels, they can automatically be removed from the marketing list or moved to a different list. Choose 'Unsubscribe' to remove them from their existing list. Choose 'subscribe' to remove them from their existing list and add them to a new list. Choose the new list from the drop down menu.
Run List Server Cancel Code when?
Choose at which point you would like the member to change according to the List Server Cancel Code. Should the cancel code run when the member goes 'inactive', 'cancels' or is 'deleted' from the system.
Press the button
Once that has been completed, the subscription form can be created using the Subscription Form Generator
Create the Subscription Form
Under 'Tools' choose 'Subscription Form Generator'
Follow the instructions found in the 'Subscription Form Generator' Tutorial
Using the Business Membership Plan
The primary account user will join the site by subscribing to become a member using the subscription form set up for business memberships.
The Primary User can Invite users through this link on your site:
/members/programs/subusers_invite.cfm
For example, the link for membergate.com would be: //www.membergate.com/members/programs/subusers_invite.cfm
The Primary User would add the email address of someone that they would like to invite as a member under the primary user's account and press the 'Invite Sub-users' button.
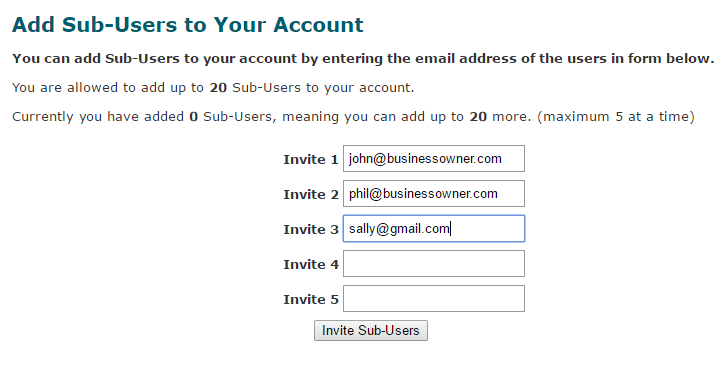
The sub-user invitee will receive the invite email message created in part 7 above.

The sub-user will click on the 'Create Your Account' link to then join the site as well. As subusers join, the number of subusers that can be invited will be deducted from the subuser limit.
5. The primary user can manage and edit the subusers through this link from your site:
/members/programs/subusers_edit.cfm
For example, the link for membergate.com would be: //www.membergate.com/members/programs/subusers_edit.cfm
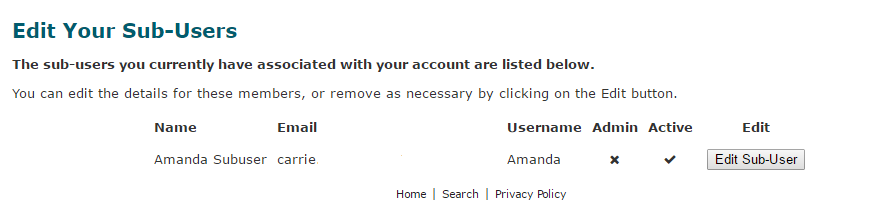
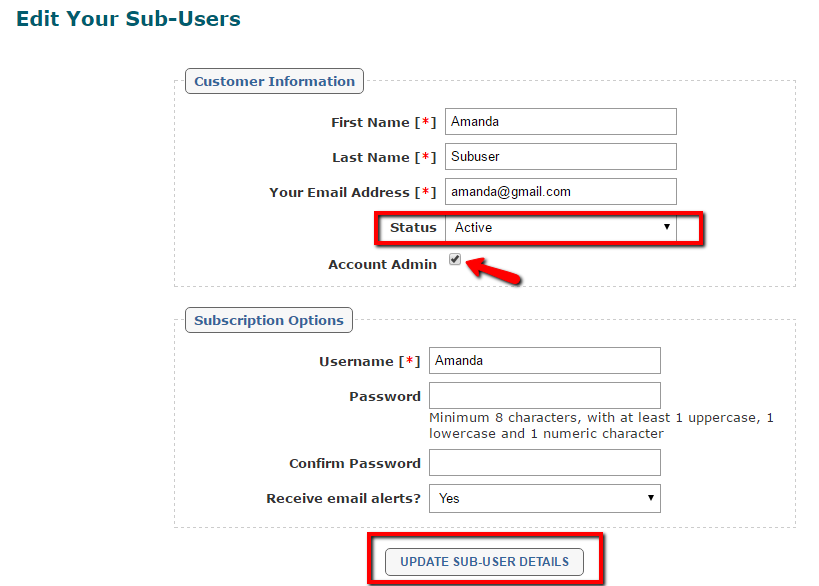
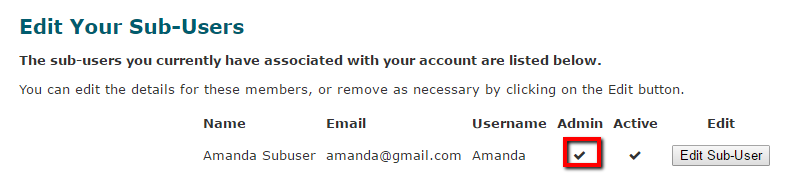
The primary user can click on the 'edit sub-user' button to manage the sub-users details
The sub-user can be made an admin by checking the 'Account Admin' box or their status can be updated by choosing 'active' or 'inactive' in the 'status' field. Once the sub-user has been edited, click the 'Update Sub-user Details' box.
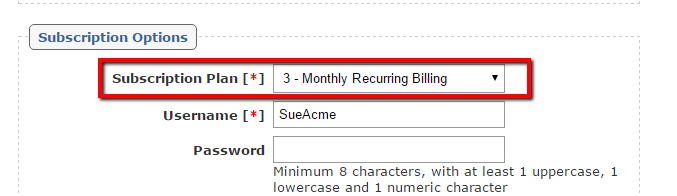
If the sub-user can be added to a different member plan, that plan can be selected from the drop down menu in the 'Subscription Plan' field.
Once the sub-user has become an 'admin' for the account, they will be able to access the edit field for sub-users as well (members/programs/subusers_edit.cfm)
Links for the Business Plan Users
The Primary User can Invite users through this link on your site:
/members/programs/subusers_invite.cfm
The primary user can Manage and Edit the Subusers through this link from your site:
/members/programs/subusers_edit.cfm